Introduction
![]()
What is Rust?
Rust เป็นภาษา Programming สมัยใหม่ ถูกสร้างมาเพื่อแก้ไขปัญหาของภาษา C,C++ เช่น ความปลอดภัยเกี่ยวกับ Memory โดยไม่จำเป็นต้องใช้ Garbage Collector แต่ยังคงประสิทธิภาพสูงใกล้เคียงกับภาษา C,C++ อยู่ และสามารถทำงานแบบ Concurrent (Multi-threaded) ได้อย่างปลอดภัยและมีประสิทธิภาพ
ปัจจุบันเริ่มมีความนิยมในการนำ Rust มาใช้ในงานด้าน Web Development อย่างแพร่หลายมากขึ้น โดยมี Development Tools สมัยใหม่ๆที่เริ่มได้รับความนิยม เช่น
- Turbo Repo & Turbo Pack
- SWC - Speedy Web Compiler
- Rspack - The fast Rust-based web bundler
- Biomejs - A Rust-based linter & formatter
- Deno
- SurrealDB
- Meilisearch
- Cloudflare
- ฯลฯ
Maintainer
Rust ได้จัดตั้งเป็นองค์กรอิสระที่มีชื่อว่า Rust Foundation เพื่อดูแลและพัฒนาภาษา Rust อย่างเป็นระบบอย่างสม่ำเสมอ โดยได้รับการสนับสนุนจากบริษัทใหญ่ๆมากมาย เช่น Microsoft, AWS, Google, Meta, Huawei และ Mozilla เป็นต้น

Pros / Cons
Pros
- ประสิทธิภาพสูง (ใกล้เคียงกับภาษา C,C++)
- Memory Safety (Google และ Microsoft กล่าวว่า มากกว่า 70% ของปัญหา Software มาจากปัญหา Memory และปัญหา Software hacks จะหมดไปหากเราเปลี่ยนไปใช้ภาษา Rust - Ref.)
- ไม่มี Garbage Collector
- เป็นภาษา Strongly Typed
- ออกแบบมาให้สามารถทำงานแบบ Concurrent (Multi-threaded) ได้อย่างปลอดภัย (Thread-safe)
- สามารถ Compile เป็น Binary code ที่สามารถ Run บน OS Layer ได้โดยตรง (no runtime overhead)
- มี Compiler ที่ฉลาดมากๆ สามารถตรวจสอบความถูกต้องได้ตั้งแต่ Compile Time รวมถึงให้คำแนะนำสำหรับ Potential Error Code ที่อาจเกิดขึ้นได้
- ทำให้เราสามารถ Maintenance ในอนาคตได้อย่างมั่นใจมากขึ้น (จาก Strongly Typed + Compiler + Strict Rules ของ Rust)
- มีระบบ Inline documentation ที่ดีเยี่ยม
- มี Features ของภาษาสมัยใหม่ๆ มากมาย เช่น
- Cargo - Package Manager: คล้ายกับ
npmใน Node.js สำหรับจัดการ Package และ Dependency ของ Project - Async/Await: คล้ายกับ
async/awaitใน JavaScript สำหรับการจัดการงานแบบ Asynchronous (แต่ใน Rust จะเป็นการทำงานแบบ Multi-threaded) - Macros
- Generics
- Traits
- Pattern Matching
- Smart Pointers
- อื่นๆ
- Cargo - Package Manager: คล้ายกับ
Cons
- มี Learning curve ค่อนข้างสูงในตอนเริ่มต้น
- เนื่องจากมี Features สมัยใหม่ๆค่อนข้างมาก เราจะเจอสิ่งใหม่ๆที่แปลกตามากขึ้น จึงทำให้ต้องใช้เวลาศึกษามากขึ้น
- เนื่องจากเป็นภาษา Safety สูง จึงจำเป็นต้องมี Rules ที่เคร่งครัดมากขึ้น
- ใช้เวลาในการ Compile ที่ค่อนข้างนาน (เนื่องจากมีกระบวนการตรวจสอบความถูกต้องทางด้านความปลอดภัยที่เข้มข้น และการ optimization ที่ละเอียด)
- ความยืดหยุ่นในการเขียน Code น้อยลง เนื่องจากเป็นภาษา Strongly Typed และมี Rules ที่ต้องตรวจสอบความปลอดภัย
- ใช้งาน JSON ค่อนข้างยุ่งยาก เนื่องจากต้องมีการแปลงข้อมูลไปมาระหว่าง JSON และ struct ในภาษา Rust
Other Showcases
- Compare - How Much Memory Do You Need to Run 1 Million Concurrent Tasks?
- Why Discord is switching from Go to Rust
- Microsoft Start Using Rust for Windows Kernel
- Google Migrate Android Kernel from C++ to Rust
- Google Plans to Migrate Android Platform Tools & Libraries from Go, C++ to Rust
- TRACTOR - US Government to Convert All C Code to Rust
- US Government Endorse Rust Over C,C++
- Apple Recruit Rust Developers for Migrate CloudKit from C to Rust
- Rust for Linux Kernel
- Samsung TizenOS
- BlueOS
Installation
Install Rust
-
Run คำสั่งต่อไปนี้ (ใช้ได้เฉพาะบน Unix-like OS เช่น Linux, macOS, WSL2)
curl --proto '=https' --tlsv1.2 -sSf https://sh.rustup.rs | shหรือเข้าไปที่ Rust Installation
-
ตรวจสอบว่า Rust ถูกติดตั้งหรือไม่โดยใช้คำสั่งต่อไปนี้
rustc --version -
ตรวจสอบว่า Cargo ถูกติดตั้งหรือไม่โดยใช้คำสั่งต่อไปนี้
cargo --version -
ติดตั้ง Extension ดังต่อไปนี้ เพื่อใช้ในการพัฒนาโปรแกรมด้วย Rust
- VSCode Extensions
- Rust Analyzer - เพื่อทำให้ VSCode รู้จักภาษา Rust และสามารถตรวจสอบความถูกต้องของ Code ได้ รวมถึงเป็นตัวช่วย auto-complete, linter, formatter ไปในตัวด้วย
- Dependi - เอาไว้ตรวจสอบ Version และเข้าถึง Doc ของ Dependency ที่เราใช้ใน Project
- Even Better TOML - เพื่อทำให้ VSCode รู้จักรูปแบบของ TOML และสามารถใช้จัด Format และ auto-complete ได้
- Error Lens (Optional) - ใช้แสดง Error หรือ Warning บนบรรทัดที่เกิดขึ้นได้อย่างชัดเจนขึ้น
- ติดตั้ง Cargo Extension ด้วยคำสั่ง
cargo install <extension-name>ดังต่อไปนี้- cargo-watch - เอาไว้ใช้ Run
project โดยสามารถ Watch การเปลี่ยนแปลงของไฟล์ได้ (ทำงานคล้ายกับ
nodemonใน Node.js) - cargo-run-script -
เอาไว้ใช้ Run script ที่อยู่ใน
Cargo.tomlได้ - cargo-nextest -
Alternative test runner ของ Rust ซึ่งมีประสิทธิภาพสูงกว่า
cargo testและอ่านผลลัพธ์ได้ง่ายขึ้น
- cargo-watch - เอาไว้ใช้ Run
project โดยสามารถ Watch การเปลี่ยนแปลงของไฟล์ได้ (ทำงานคล้ายกับ
- VSCode Extensions
Update Rust
-
Run คำสั่งต่อไปนี้
rustup update <:channel>channelคือช่องทางการอัปเดต ซึ่งสามารถเลือกได้เพียง 3 ช่องทาง คือstable,betaหรือnightlyเท่านั้น
-
ตรวจสอบ Version ของ Rust หลังจากอัปเดตแล้ว
rustc --version
Uninstall Rust
-
Run คำสั่งต่อไปนี้
rustup self uninstall sudo rm -rf $HOME/.cargo sudo rm -rf $HOME/.rustup -
ตรวจสอบว่า Rust ถูกถอดออกแล้วหรือไม่โดยใช้คำสั่งต่อไปนี้
rustc --version -
ตรวจสอบว่า Cargo ถูกถอดออกแล้วหรือไม่โดยใช้คำสั่งต่อไปนี้
cargo --version
Cargo

note
Cargo คือ build system และ package manager สำหรับภาษา Rust (เปรียบเสมือนกับ NPM ของ NodeJS)

Cargo Commands
# --------- ที่ต้องรู้ ---------
cargo new <project_name>      # สร้างโปรเจ็คใหม่
cargo init <project_name>     # คล้ายกับ cargo new แต่สามารถสร้างโปรเจ็คจากโฟลเดอร์ที่มีอยู่ได้ เช่น cargo init .
cargo build                   # build project เป็น executable file ใน debug mode (ใช้สำหรับ development)
cargo build --release         # build project เป็น executable file ใน release mode (ใช้สำหรับ production)
cargo run                     # build & run project ใน debug mode
cargo run --release           # build & run project ใน release mode
cargo add <crate_name>        # เพิ่ม dependency ให้กับโปรเจ็ค (เหมือน yarn add <package_name>)
cargo add --dev <crate_name>  # เพิ่ม dev dependency ให้กับโปรเจ็ค
cargo update                  # อัปเดต dependency ทั้งหมดในโปรเจ็ค (ยึดตาม semver ที่กำหนดไว้ใน Cargo.toml)
cargo install <crate_name>    # ติดตั้ง crate แบบ global (เหมือน npm install -g <package_name>)
                              # ส่วนมากจะเป็น plugin ของ cargo

# --------- ที่มีประโยชน์ ---------
cargo check                # ใช้ run linter สำหรับตรวจสอบโปรเจ็ค (เบื้องต้น)
cargo clippy               # เหมือน cargo check แต่ Advanced กว่า สามารถตรวจสอบโปรเจ็คที่มีข้อผิดพลาดที่ซับซ้อนกว่าได้
                           # รวมถึงให้คำแนะนำแนวทางเขียนโปรแกรมที่ดีขึ้น
cargo fmt                  # run formatter สำหรับจัดรูปแบบ code
cargo test                 # run tests (unit test + integration test + doc test)
cargo doc                  # สร้าง Documentation สำหรับโปรเจ็ค (generate จาก code และ inline doc)
Crates.io
note
Crates คือ packages ของ Rust ที่สามารถ download มาใช้งานได้จาก
Crates.io
(เหมือน npm registry)
Project Structure
project_name/
├── Cargo.toml ------- เป็นไฟล์ที่ระบุข้อมูลของโปรเจ็คทั้งหมด (เหมือน package.json)
├── Cargo.lock ------- ใช้เก็บ cache ของ dependencies (เหมือน package-lock.json)
├── src -------------- เขียน code ใน src/ เท่านั้น, สิ่งที่อยู่ใน src/ ทั้งก้อนจะถูกเรียกว่า crate
│   ├── main.rs ------ เป็น entrypoint ของโปรเจ็ค ในกรณีที่เป็น binary crate
│   ├── lib.rs ------- เป็น entrypoint ของโปรเจ็ค ในกรณีที่เป็น library crate
│   └── utils/ ------- ทุก file หรือ folder ที่อยู่ใน src จะถูกเรียกว่า module
│       ├── mod.rs --- ทุกครั้งที่สร้าง folder ใหม่ จะต้องมีไฟล์ mod.rs เสมอ (คล้ายๆ index.js)
│       └── ...
├── target/ ---------- เก็บไฟล์ที่ถูก build แล้ว
└── tests/ ----------- folder สำหรับเขียน integration test
Crate Type
note
ใน Rust มีสองประเภทของ crate คือ binary crate และ library crate
binary crateจะสามารถ compile เป็น executable ได้และสามารถ run ได้โดยตรง เช่น application, server, script เป็นต้น โดยจะมีไฟล์main.rsเป็น entrypointlibrary crateจะไม่สามารถ run ได้โดยตรง แต่จะถูกใช้เป็น dependencies ในโปรเจ็คอื่นๆ โดยจะมีไฟล์lib.rsเป็น entrypoint
Cargo.toml
note
ทำหน้าที่ระบุรายละเอียดของโปรเจ็คทั้งหมด (เหมือน package.json)
[package] # ระบุรายละเอียดของโปรเจ็ค
    authors      = ["THiNKNET"]
    edition      = "2021" # ระบุ Rust edition
	license      = "Copyright © 2018 THiNKNET Co., Ltd. All Rights Reserved."
	name         = "project_name" # ต้องเป็น snake_case
	readme       = "README.md"
	repository   = "xxx"
	rust-version = "1.80" # minimum rust version
	version      = "0.1.0" # version ของโปรเจ็ค

# Find more dependencies at https://crates.io/
[dependencies] # ระบุ dependencies ของโปรเจ็ค
    serde      = { version = "1.0", features = ["derive"] } # สามารถตั้งค่าการ import ได้หลายอย่าง
    serde_json = "1.0" # หรือจะระบุแค่ version ก็ได้

[dev-dependencies] # ระบุ dependencies ของโปรเจ็ค เฉพาะในการพัฒนา (เหมือน devDependencies ใน package.json)
    pretty_assertions = "1"
How to Create new Module in Project
tip
ทุกไฟล์หรือ folder ที่อยู่ใน src/ จะถูกเรียกว่า module
File
Example New File Module
สมมติว่าต้องการสร้าง module ใหม่ที่ชื่อว่า my_func
-
สร้างไฟล์ใหม่ที่ชื่อว่า
my_func.rsในsrc/src/ ├── main.rs └── my_func.rs -
เพิ่ม function หรือ struct ต่างๆ ในไฟล์
my_func.rs#![allow(unused)] fn main() { // src/my_func.rs // ต้องใส่ pub (ย่อจาก public) นำหน้าของ function หรือ struct หากต้องการให้สามารถเรียกใช้จากภายนอกได้ pub fn my_func() { println!("Hello, world!"); } pub struct MyStruct { // ต้องใส่ pub นำหน้าของ field ใน struct ด้วยเช่นกัน หากต้องการให้สามารถเรียกใช้จากภายนอกได้ pub name: String, } } -
ประกาศ
mod my_func(ชื่อไฟล์) ในไฟล์main.rsหรือlib.rsเพื่อให้ project รู้จัก module นี้// src/main.rs mod my_func; // ประกาศว่า project นี้มี module ชื่อว่า `my_func` อยู่ use my_func::MyStruct; // ใช้ use (เหมือน import ในภาษาอื่นๆ) เพื่อเรียกใช้ module นี้ fn main() { let my_struct = MyStruct { name: "John".to_string() }; println!("{}", my_struct.name); }
Folder
สมมติว่าต้องการสร้าง module ใหม่ที่ชื่อว่า my_utils/ และภายใน folder นี้มีไฟล์หลายๆ ไฟล์
-
สร้างไฟล์ใหม่ที่ชื่อว่า
my_utils/ในsrc/src/ ├── main.rs └── my_utils/ ├── mod.rs ------------ หากสร้าง folder จะต้องมีไฟล์นี้เสมอ (คล้ายๆ index.js แต่ใน Rust บังคับให้ต้องมี) ├── my_func.rs └── my_struct.rs -
เพิ่ม function หรือ struct ต่างๆ ลงในไฟล์ลูกภายใน
my_utils/เหมือนกันกับการสร้างไฟล์แบบด้านบน -
ภายในไฟล์
mod.rsของmy_utils/ต้องประกาศว่ามี modulemy_funcและmy_structอยู่ (คล้ายๆกับ main.rs แต่ mod.rs มีหน้าที่ควบคุม module ย่อยของตัวเอง)#![allow(unused)] fn main() { // src/my_utils/mod.rs // pub mod หากต้องการให้ module ย่อยนี้สามารถเรียกใช้จากภายนอกได้ pub mod my_func; // หากไม่ใส่ pub จะทำให้ module ย่อยนี้เป็น private ซึ่งจะสามารถเรียกใช้ได้ภายใน folder นี้เท่านั้น mod my_struct; } -
ประกาศ
mod my_utils(ชื่อ folder) ในไฟล์main.rsหรือlib.rsเพื่อให้ project รู้จัก module นี้#![allow(unused)] fn main() { // src/main.rs mod my_utils; // ประกาศว่า project นี้มี module ชื่อว่า `my_utils` อยู่ }
Fundamental
Virtual Memory Layout
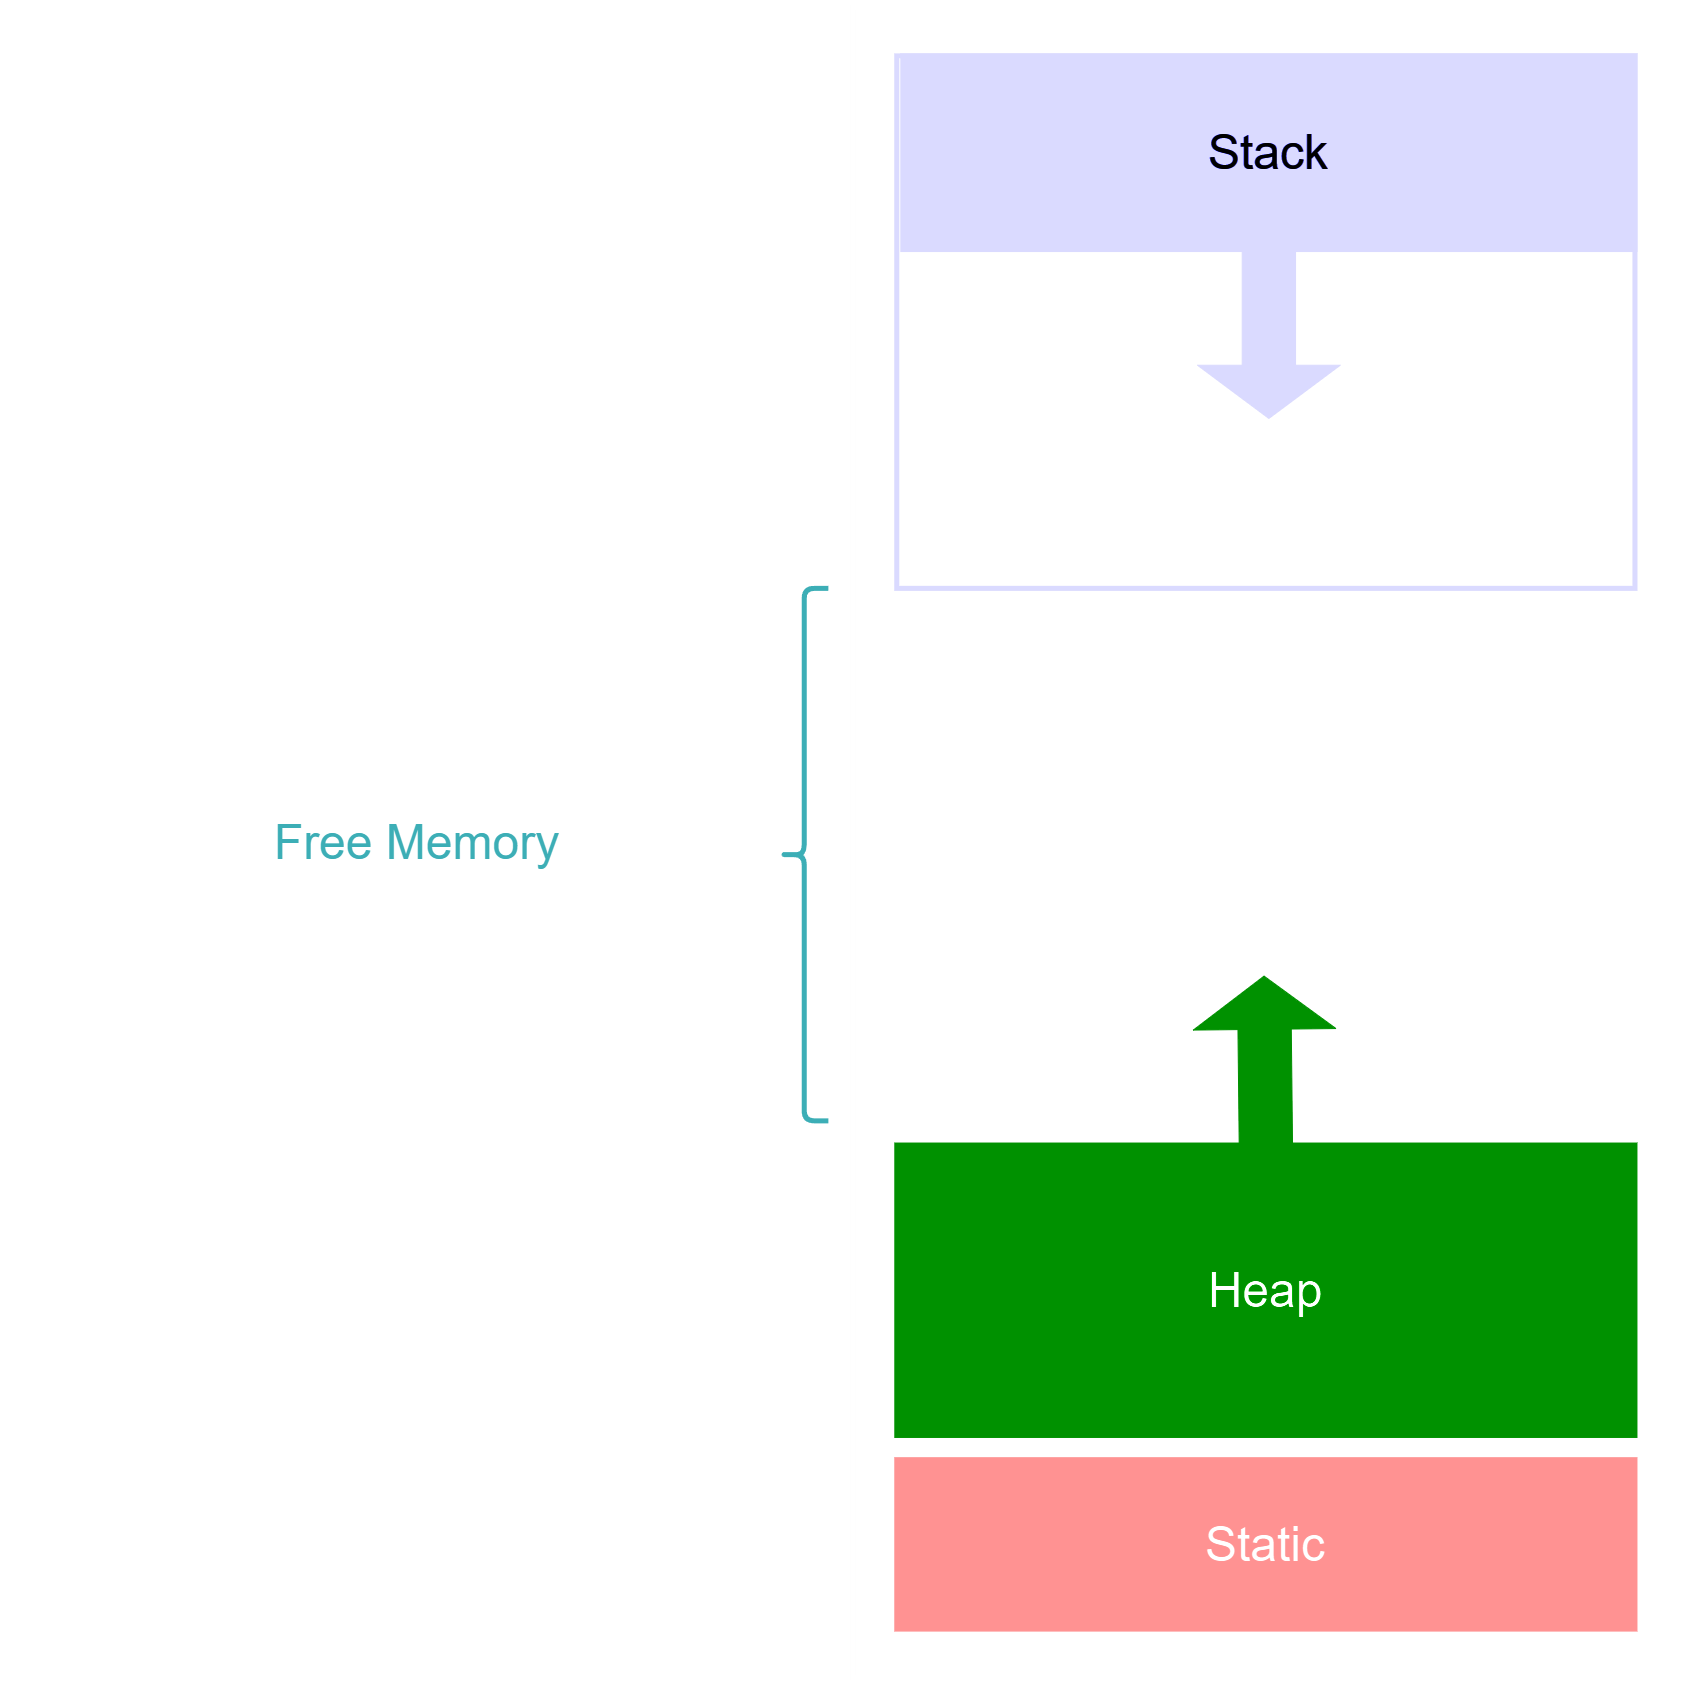
คำอธิบายเกี่ยวกับ Memory Layout
ในระบบคอมพิวเตอร์ การจัดการหน่วยความจำถูกแบ่งออกเป็นส่วนต่างๆ ที่มีหน้าที่และคุณสมบัติที่แตกต่างกัน โดยทั่วไปแบ่งออกเป็นสามส่วนหลักคือ Stack, Heap, และ Static ซึ่งแต่ละส่วนมีลักษณะเฉพาะตัวดังนี้:
Stack
- Content:
- Function arguments
- Local variables ที่รู้ขนาดตั้งแต่ช่วงที่ compile
- Size:
- ขนาดไดนามิก แต่มีขีดจำกัดที่ตั้งไว้
- Lifetime:
- ตามอายุของฟังก์ชันที่สร้างขึ้น
Stack ถูกใช้เพื่อจัดเก็บข้อมูลที่มีขนาดคงที่และมีอายุการใช้งานสั้น เช่น ตัวแปรภายในฟังก์ชัน ซึ่งข้อมูลบน stack จะถูกจัดเก็บและลบออกอย่างเป็นระบบตามลำดับการเรียกใช้งานฟังก์ชัน
Heap
- Content:
- ข้อมูลที่มีขนาดใหญ่
- ข้อมูลที่ไม่รู้ขนาดในช่วงที่ compile
- ข้อมูลที่จะต้องมีอายุอยู่นานกว่าอายุของฟังก์ชัน
- Size:
- ขนาดไดนามิก ไม่มีขีดจำกัด
- Lifetime:
- แต่ละภาษาจัดการไม่เหมือนกัน
Heap ใช้สำหรับจัดเก็บข้อมูลที่มีขนาดใหญ่หรือข้อมูลที่ขนาดไม่สามารถระบุได้ในขณะ compile โดยข้อมูลบน heap จะมีอายุการใช้งานยาวนานกว่า stack และการจัดการหน่วยความจำบน heap มักจะต้องมีการจัดการด้วยตนเองหรือผ่าน garbage collector ขึ้นอยู่กับภาษาโปรแกรมที่ใช้งาน
Static
- Content:
- ตัวแปรแบบ static
- string literals
- ไบนารี
- Size:
- ขนาดคงที่
- Lifetime:
- ตลอดอายุของโปรเซส หากโปรเซสถูกยุติ ข้อมูลก็จะถูกลบออกด้วย
ส่วน Static ใช้สำหรับจัดเก็บข้อมูลที่ต้องการอยู่ตลอดอายุของโปรเซส เช่น ตัวแปรคงที่ที่ไม่เปลี่ยนแปลงระหว่างการทำงานของโปรแกรม ข้อมูลเหล่านี้จะถูกจัดเก็บในพื้นที่หน่วยความจำแบบ static และไม่ถูกลบออกจนกว่าโปรเซสจะสิ้นสุด
Memory Management
| Strategy | ข้อดี | ข้อเสีย |
|---|---|---|
| Manual (C) | - มีประสิทธิภาพ - ควบคุมได้อิสระ | - เกิดข้อผิดพลาดได้ง่าย - ต้องมีความเข้าใจเรื่อง memory ระดับหนึ่ง |
| OBRM (Rust) / RAII (C++) | - มีประสิทธิภาพ - ควบคุมได้เกือบอิสระ - เกิดข้อผิดพลาดได้ยาก | - ต้องมีความเข้าใจเรื่อง memory ระดับหนึ่ง |
| Automatic (JavaScript, Python, C#) | - เกิดข้อผิดพลาดได้ยาก - เป็นภาษาที่ใช้งานง่าย | - ไม่มีประสิทธิภาพ - ไม่มีความอิสระในการควบคุมการใช้หน่วยความจำ |
note
OBRM ย่อมาจาก Ownership Based Resource Management
note
RAII ย่อมาจาก Resource Acquisition Is Initialization
note
Garbage Collector (GC) คือระบบอัตโนมัติที่จัดการ memory ในโปรแกรม โดยจะทำหน้าที่คอยตรวจสอบและ "เก็บกวาด" หน่วยความจำที่ไม่จำเป็นต้องใช้อีกต่อไป
println!
println! เป็น macro ใน Rust ที่ใช้สำหรับพิมพ์ข้อความออกไปที่คอนโซล หรือ standard output คล้ายกับ console.log ใน JavaScript
ตัวอย่างการใช้ println!
fn main() {
    println!("Hello, World!");
}
จะพิมพ์ข้อความ "Hello, World!" ออกมาที่คอนโซล
note
เราไม่สามารถใส่อะไรก็ได้เข้าไปใน println! เพื่อพิมพ์ข้อความได้แบบ console.log ของ JavaScript
dbg!
dbg! เป็น macro ที่ใช้ในการตรวจสอบค่าของตัวแปรหรือ expression ในระหว่างการพัฒนา ช่วยให้สามารถดูค่าของตัวแปรในคอนโซลได้ง่ายๆ โดยไม่ต้องทำการจัดรูปแบบเหมือน println!
ตัวอย่างการใช้ dbg!
fn main() {
    let a = 10;
    let b = 20;
    let c = dbg!(a + b);
    println!("[src/main.rs:4:13] a + b = {}", c);
}
จะพิมพ์ข้อความ "[src/main.rs:4:13] a + b = 30" ออกมาที่คอนโซล
note
สิ่งที่แตกต่างจาก println!
- ข้อมูลที่แสดงใน
dbg!จะแสดงชื่อของตัวแปรและค่าของมัน พร้อมกับตำแหน่งที่อยู่ในโค้ด (ไฟล์และบรรทัด) ทำให้สามารถติดตามได้ว่าเกิดอะไรขึ้นที่ไหน - ไม่จำเป็นต้องจัดรูปแบบข้อความเหมือน
println!ซึ่งทำให้ใช้งานได้ง่ายและรวดเร็วในการ debug dbg!จะคืนค่าของ expression ที่ส่งเข้าไป
Syntax พื้นฐาน
let
let ใน Rust ใช้สำหรับการประกาศตัวแปร คล้ายกับ let หรือ const ใน JavaScript ซึ่งช่วยให้สามารถสร้างตัวแปรใหม่ได้
ตัวอย่างการใช้ let
fn main() {
    let a:i32 = 5;
    println!("{}", a);
}
note
:i32 คือการบอกว่า a มีชนิดข้อมูลเป็น i32
note
การเลือกชนิดข้อมูลอย่างเหมาะสม จะช่วยให้การใช้งานหน่วยความจำมีประสิทธิภาพมากขึ้น
note
เราสามารถประกาศตัวแปรชื่อซ้ำได้ ซึ่งจะทำให้ไม่สามารถเข้าถึงข้อมูลของตัวแปรก่อนหน้า (shadowing) ตัวอย่าง:
fn main() {
    let a:i32 = 5;
    let a:char = 'A';
    println!("{}", a);
}
mut
ตัวแปรที่ประกาศด้วย let จะเป็น immutable (ไม่สามารถเปลี่ยนแปลงค่าได้) โดยค่าเริ่มต้น ถ้าต้องการให้ตัวแปรสามารถเปลี่ยนแปลงค่าได้ จะต้องใช้ mut
ตัวอย่าง
fn main() {
    let a:i32 = 5;
    a += 1;
    println!("{}", a);
}
Compiling playground v0.0.1 (/playground)
error[E0384]: cannot assign twice to immutable variable `a`
 --> src/main.rs:3:5
  |
2 |     let a:i32 = 5;
  |         - first assignment to `a`
3 |     a += 1;
  |     ^^^^^^ cannot assign twice to immutable variable
  |
help: consider making this binding mutable
  |
2 |     let mut a:i32 = 5;
  |         +++

For more information about this error, try `rustc --explain E0384`.
error: could not compile `playground` (bin "playground") due to 1 previous error
จะเกิด Error เพราะ a เป็น immutable ซึ่งเราสามารถแก้ได้โดยการใช้ mut ตามตัวอย่างข้างล่าง
fn main() {
    let mut a:i32 = 5;
    a += 1;
    println!("{}", a);
}
const
const ใน Rust ใช้สำหรับการประกาศค่าคงที่ที่ไม่สามารถเปลี่ยนแปลงได้ โดยต้องระบุชนิดข้อมูลอย่างชัดเจน และค่าต้องถูกคำนวณใน compile-time ซึ่งทำให้ const ใน Rust มีลักษณะและข้อกำหนดที่ชัดเจนกว่าการใช้ const ใน JavaScript
ตัวอย่างการใช้งาน const
const GLOBAL:i32 = 10;

fn add(a:i32, b:i32) -> i32 {
    a + b
}

fn main() {
    const CONST:i32 = 5;
    println!("{}", GLOBAL);
    println!("{}", CONST)
}
note
ฟังก์ชัน add รับพารามิเตอร์ a และ b แล้วคืนค่า a + b
ลองแก้ Code ดู
- เราใช้
letแทนconstสำหรับตัวแปรGLOBALได้ไหม?- เราประกาศ
const CONST: i32 = add(2, 3);ได้ไหม?
static
static ใน Rust ใช้สำหรับประกาศค่าหรือข้อมูลที่มีอายุการใช้งานตลอดทั้งโปรแกรม ซึ่งหมายความว่าค่าหรือข้อมูลที่ประกาศด้วย static จะถูกจัดเก็บในพื้นที่หน่วยความจำแบบ static (static memory) และจะไม่ถูกลบออกเมื่อออกจาก scope ที่ประกาศ
ตัวอย่างการใช้งาน static
static mut GLOBAL:i32 = 10;

fn something() -> &'static str {
    "Hello, World!"
}

fn main() {
    let a: &str = something();
    println!("{}", a);
}
note
การใช้งาน หรือแก้ไขค่าตัวแปรที่เป็น static mut จะต้องทำใน unsafe block ซึ่งจะไม่อยู่ใน scope ของ Workshop EDM - Rust 2024
note
' ใน Rust ใช้สำหรับบอก lifetime
ลองแก้โค้ดดู
- เราประกาศ
const mut GLOBAL:i32 = 10;ได้ไหม?- ถ้าเราเปลี่ยน
fn something() -> &'static str {
    "Hello, World!"
}
เป็น
fn something() -> &str {
    "Hello, World!"
}
จะเกิดอะไรขึ้น?
Integer
ในภาษา Rust การจัดการตัวเลขจำนวนเต็ม (Integer) มีการกำหนดประเภทที่ชัดเจนตามขนาดและชนิดของจำนวนเต็มที่ต้องการใช้ เช่น ขนาดของบิต (เช่น 8, 16, 32, 64, 128) และลักษณะการเก็บข้อมูล (Signed หรือ Unsigned)
- Signed integers (
i8,i16,i32,i64,i128): ตัวเลขจำนวนเต็มที่สามารถเป็นค่าได้ทั้งบวกและลบ - Unsigned integers (
u8,u16,u32,u64,u128): ตัวเลขจำนวนเต็มที่ไม่เป็นค่าลบ
ข้อจำกัด
เนื่องจาก Signed integers สามารถเก็บจำนวนลบได้ ทำให้ในกรณีที่จำนวนบิตเท่ากัน Unsigned integers จะสามารถเก็บจำนวนบวกได้มากกว่า
note
ตัวอย่าง Integer ขนาด 8 บิต
i8จะมีช่วงของค่าอยู่ที่ -27 จนถึง 27 - 1u8จะมีช่วงของค่าอยู่ที่ 0 จนถึง 28 - 1
ตัวอย่างการใช้งาน Integer
fn main() {
    let u_int:u8 = 255;
    let int:i8 = 127;
    println!("{} {}", u_int, int);
}
ลองคิดดู
- จะเกิดอะไรขึ้นถ้าเราทำให้ค่าของตัวแปรไม่อยู่ในช่วงของประเภทที่เราประกาศ?
u32มีช่วงของค่าที่เก็บได้เป็นเท่าไหร่?i32มีช่วงของค่าที่เก็บได้เป็นเท่าไหร่?
Float
ในภาษา Rust ตัวเลขทศนิยมถูกแบ่งออกเป็นประเภทที่ชัดเจน โดยมี 2 ประเภทหลัก:
f32: ตัวเลขทศนิยมแบบ 32 บิตf64: ตัวเลขทศนิยมแบบ 64 บิต
การใช้ f32 และ f64 ขึ้นอยู่กับความต้องการในการจัดเก็บและความแม่นยำที่ต้องการในการคำนวณ โดยทั่วไปแล้ว f64 จะถูกใช้เป็นค่าเริ่มต้นเนื่องจากมีความแม่นยำสูงกว่า
ตัวอย่างการใช้งาน Float
fn main() {
    let f1:f32 = 1.0;
    let f2:f32 = 7.0;
    println!("{}", f1 / f2);
}
ลองแก้โค้ดดู
- ลองเปลี่ยนชนิดของ
f1และf2เป็นf64แล้วดูผลลัพธ์มีความแตกต่างจากเดิมหรือไม่- ลองเปลี่ยน
f1และf2เป็นintegerแล้วสังเกตความแตกต่างที่เกิดขึ้น
Type Conversion
ในการเขียนโปรแกรมด้วยภาษา Rust บางครั้งเราจำเป็นต้องแปลงค่าจากชนิดข้อมูลหนึ่งไปยังอีกชนิดหนึ่ง เช่น จาก f64 ไปเป็น i64 หรือจาก u32 ไปเป็น f64
การแปลงชนิดข้อมูลสามารถทำได้โดยใช้คำสั่ง as ซึ่งเป็นตัวดำเนินการสำหรับการแปลงชนิดข้อมูลใน Rust
ตัวอย่างการแปลงชนิดข้อมูล
fn main() {
    let float_num: f64 = 10.5;
    let int_num: i64 = float_num as i64;
    println!("{} convert to {}", float_num, int_num);
}
ในตัวอย่างนี้ เราแปลงค่าจาก f64 ไปเป็น i64 โดยใช้ as i64 ซึ่งจะตัดส่วนทศนิยมออก
การดำเนินการกับตัวเลขชนิดต่างกัน
ในการดำเนินการทางคณิตศาสตร์ เช่น การบวก ลบ คูณ หาร หรือการเปรียบเทียบ Rust จะไม่อนุญาตให้ดำเนินการกับตัวแปรที่มีชนิดข้อมูลต่างกัน เราต้องทำการแปลงชนิดข้อมูลให้ตรงกันก่อนจึงจะสามารถดำเนินการได้
ตัวอย่างการดำเนินการกับตัวแปรชนิดต่างกัน
fn main() {
    let int_num: i32 = 10;
    let float_num: f32 = 5.5;
    let result = int_num as f32 + float_num;
    println!("sum : {}", result);
}
ในตัวอย่างนี้ หากเราพยายามบวก int_num กับ float_num โดยตรงจะเกิดข้อผิดพลาด เนื่องจากชนิดข้อมูลไม่ตรงกัน เราจึงต้องแปลง int_num เป็น f32 ก่อนด้วย as f32
note
Rust เป็นภาษาที่มีความเข้มงวดในการจัดการชนิดข้อมูล เพื่อป้องกันข้อผิดพลาดที่อาจเกิดขึ้นจากการแปลงชนิดข้อมูลโดยไม่ได้ตั้งใจ
ลองทำดู
- ลองแปลง
float_numเป็นi32แล้วสังเกตค่าที่ได้- ลองดำเนินการคูณระหว่าง
u8และi8โดยไม่แปลงชนิดข้อมูล แล้วดูว่ามีข้อผิดพลาดอะไรเกิดขึ้น?- ลองแปลง
i32เป็นu32และลองใส่ค่าที่เป็นลบ ดูว่าเกิดอะไรขึ้น?
Char
ในภาษา Rust มีประเภทข้อมูลที่ชัดเจนสำหรับตัวอักษรคือ char ซึ่งรองรับตัวอักษรทุกภาษา รวมถึงอีโมจิและสัญลักษณ์พิเศษ
ตัวอย่างการใช้งาน char
fn main() {
    let c: char = 'ก';
    let emoji: char = '😊';
    println!("{} {}", c, emoji);
}
ลองแก้โค้ดดู
- ลองเปลี่ยนเครื่องหมาย
'เป็น"จะเกิดอะไรขึ้น?- ลองเพิ่มตัวอักษรเข้าไปใน
'...'ให้มีมากกว่า 1 ตัวอักษร จะเกิดอะไรขึ้น?
String
ในภาษา Rust ชนิดข้อมูล String เป็นชนิดข้อมูลที่สามารถปรับขนาดได้และเก็บข้อมูลบน heap สามารถแก้ไขได้
note
ใน Rust "Hello, World!" ยังไม่ใช่ String แต่เป็น string slice (&str)
note
"Hello, World!" เรียกว่าตัวอักษร string (string literal) ซึ่งจัดเก็บในพื้นที่หน่วยความจำแบบ static (static memory)
ตัวอย่างการใช้งาน String
fn main() {
    let s:&str = "This is my string";

    let s1:String = String::from("hello world");
    let s2:String = "hello".to_string();
    let s3:String = "world".to_owned();
    let s4:String = format!("{} {}", s2, s3);
    let s5:String = s2 + " " + &s3;

    println!("s1 is {}\ns4 is {}\ns5 is {}", s1, s4, s5);

}
ลองแก้โค้ดดู
- ลองเปลี่ยนชนิดของ
s1,s2,s3,s4, หรือs5ให้เป็น&strจะเกิดอะไรขึ้น?- ลองใช้เมธอดต่างๆ ของ
Stringเช่นpush,pop, หรือreplaceเพื่อดูการเปลี่ยนแปลงของข้อมูล
Array
ในภาษา Rust โครงสร้างข้อมูลแบบ Array จะมีความคล้ายคลึงกับ Array ในภาษา C หรือ C++ โดยมีข้อจำกัดดังต่อไปนี้:
- ขนาดคงที่: เมื่อสร้างแล้วไม่สามารถเพิ่มหรือลดขนาดได้
- ชนิดข้อมูลเดียวกัน: ข้อมูลที่เก็บต้องเป็นประเภทเดียวกันทั้งหมด
ตัวอย่างการใช้งาน Array
fn main() {
    let mut arr: [i32; 3] = [0, 0, 0];
    arr[1] = 5;
    let a = arr[1];
    println!("{:?}", arr);
    println!("{}", arr[0]);
    println!("{}", a);
}
คำถามให้ลองทำ
- หากประกาศ
let arr = [0; 3];ผลลัพธ์จะเป็นอะไร?- จะประกาศ array ขนาด 10,000 ที่มีแต่
'A'ได้อย่างไร
Tuple
Tuple ในภาษา Rust มีความคล้ายคลึงกับ Array แต่มีข้อแตกต่างที่ Tuple สามารถเก็บข้อมูลที่มีชนิดต่างกันได้
ตัวอย่างการใช้งาน Tuple
fn main() {
    let mut t:(u8, f64, char) = (1, 1.0, '1');

    t.0 = 2;
    t.1 = 3.3;
    t.2 = '5';

    let c = t.2;

    let (a, b, _) = t;

    println!("{:?}", t);
}
Vector
Vector คือโครงสร้างข้อมูลแบบ Array ที่สามารถเพิ่มหรือลดขนาดได้ เนื่องจากถูกเก็บอยู่ใน Heap Memory
note
การที่ข้อมูลถูกเก็บไว้ใน Heap ทำให้สามารถขจัดข้อจำกัดเรื่องขนาดได้ แต่มีผลกระทบต่อประสิทธิภาพเมื่อเทียบกับข้อมูลที่เก็บอยู่ใน Stack
note
vec![] คือ macro ที่ใช้สำหรับสร้าง Vector
ตัวอย่างการใช้งาน
fn main() {
    let mut a = vec![0; 10];
    a.push(1);
    println!("{}", a[10]);
    println!("{:?}", a);
    a.pop();
    println!("{:?}", a);
}
ลองแก้โค้ดดู
- ลองประกาศ Array ของเลข 0 ทั้งหมด 10 ล้านตัวว่าจะเกิดอะไรขึ้น
- ลองเปลี่ยนเป็นประกาศ Vector ของเลข 0 ทั้งหมด 10 ล้านตัว
note
ในภาษา Rust สามารถใช้ _ คั่นตัวเลขได้ เช่น let i:i32 = 10_000_000;
Slice
Slice เป็นการอ้างอิงถึงส่วนหนึ่งของข้อมูลที่มีอยู่แล้ว ซึ่งช่วยให้การเข้าถึงข้อมูลมีประสิทธิภาพและใช้หน่วยความจำน้อยลง เนื่องจากไม่ต้องทำการคัดลอกข้อมูล
note
ในภาษา JavaScript การใช้ .slice() จะเป็นการคัดลอกข้อมูล
ตัวอย่างการใช้ Slice
fn main() {
    let s:&str = "Hello World";
    let string:String = s.to_string();
    let slice:&str = &string[..5];

    let arr:[i32;5] = [1, 2, 3, 4, 5];
    let arr_slice:&[i32] = &arr[1..4];

    println!("{}", slice);
    println!("{:?}", arr_slice);
}
Struct
ในภาษา Rust, struct คล้ายกับ Object ใน JavaScript ซึ่งใช้เก็บข้อมูลหลายประเภทเข้าด้วยกัน แต่ต่างจาก JavaScript ตรงที่ Rust เป็นภาษาที่มีชนิดข้อมูลทุก field ใน struct ต้องระบุชนิดข้อมูลอย่างชัดเจน
ตัวอย่างการใช้งาน struct
struct People {
    first_name: String,
    last_name: String,
    age: u8,
}

fn main() {
    let mut people = People {
        first_name: "name".to_string(),
        last_name: "lastname".to_string(),
        age: 50,
    };

    people.age += 1;

    let first_name = people.first_name;

    println!("{} {} {}", first_name, people.last_name, people.age);
}
note
นอกจาก struct แบบมีชื่อ field, Rust ยังมี tuple struct และ unit struct
 struct Color(u8, u8, u8);
 struct Unit;
การ Implement ฟังก์ชันให้ struct
สามารถทำได้โดยใช้ impl keyword เพื่อให้ struct มีฟังก์ชันที่สามารถเรียกใช้งานได้
ตัวอย่างการ Implement ฟังก์ชันให้ struct
struct Unit;

fn main() {
    let a = Unit;

    Unit::hello();
    a.s_hello();
}

impl Unit {
    fn hello() {
        println!("hello");
    }

    fn s_hello(&self) {
        println!("s_hello");
    }
}
note
เทียบได้กับ Typescript
class Unit {

    constructor() {
    }

    static hello() {
        console.log("hello")
    }

    s_hello() {
        console.log("s_hello")
    }

}

const a = new Unit();

Unit.hello();
a.s_hello();
Enum
Enum ในภาษา Rust เป็นการกำหนดประเภทข้อมูลที่สามารถมีหลายรูปแบบ แต่ละรูปแบบของ enum สามารถเก็บข้อมูลได้แตกต่างกัน
ตัวอย่างการใช้งาน Enum
enum DataType {
    Type1,
    Type2 { x: i32, y: i32 },
    Type3(String),
    Type4(u8, u8, u8),
}

fn main() {
    let data1 = DataType::Type1;
    let data2 = DataType::Type2 { x: 0, y: -4 };
    let data3 = DataType::Type3("hello world".to_string());
    let data4 = DataType::Type4(42, 123, 255);
}
note
เทียบได้กับ Typescript
 type DataType =
 | { type: "type1" }
 | { type: "type2", x: number, y: number }
 | { type: "type3", text: string }
 | { type: "type4", r: number, g: number, b: number }

const data1 = { type: "type1" }
const data2 = { type: "type2", x: 0, y: -4 }
const data3 = { type: "type3", text: "hello world" }
const data4 = { type: "type4", r: 42, g: 123, b: 255 }
การ Implement ฟังก์ชันให้ Enum
ในภาษา Rust เราสามารถ implement ฟังก์ชันให้กับ enum ได้เช่นเดียวกับ struct
ตัวอย่างการ Implement ฟังก์ชันให้ Enum
enum DataType {
    Type1,
    Type2,
}

impl DataType {
    fn something() {
        println!("do something")
    }
}

fn main() {
    let data = DataType::Type1;
    data.something();
}
Option
ในภาษา Rust ไม่มีสิ่งที่เรียกว่า null เหมือนภาษาอื่นๆ แต่จะใช้ enum ที่ชื่อ Option<T> ในการจัดการค่าที่เป็น Optional
note
Option<T> คือ enum ที่สามารถเป็นได้ 2 อย่างคือ Some(T) หรือ None
enum Option<T> {
   Some(T),
   None,
}
ตัวอย่างการใช้งาน Option<T>
struct Something {
    nickname: Option<String>,
    name: String,
}

fn main() {
    let s1 = Something {
        nickname: Option::Some("H".to_string()),
        name: "Hello".to_string(),
    };

    let s2 = Something {
        nickname: Option::None,
        name: "Something".to_string(),
    };
}
ลองแก้โค้ดดู
- หากลบ
Option::ออกจากโค้ด จะสามารถคอมไพล์ได้หรือไม่?
Result
ในภาษา Rust ไม่มีสิ่งที่เรียกว่า try-catch เหมือนภาษาอื่นๆ แต่จะใช้ enum ที่ชื่อ Result<T, E> ในการจัดการกับสถานการณ์ที่อาจล้มเหลว
note
Result<T, E> คือ enum ที่สามารถมีค่าได้ 2 อย่างคือ Ok(T) หรือ Err(E)
enum Result<T, E> {
   Ok(T),
   Err(E),
}
ตัวอย่างฟังก์ชันที่มีการคืนค่า Result<T, E>
use std::fs::File;
use std::io::Error;

fn open_file(filename: &str) -> Result<File, Error> {
    File::open(filename)
}

fn main() {
    match open_file("myfile.txt") {
        Ok(file) => println!("success: {:?}", file),
        Err(e) => println!("error: {}", e),
    }
}
บทที่ 1: การตัดสินใจของคนธรรมดา
โลกใบนี้ถูกปกคลุมด้วยความมืดมิด หลังจากจอมมารสังหารผู้กล้าและลักพาตัวเจ้าหญิงไป ทุกหนแห่งเต็มไปด้วยความหวาดกลัว แต่ข้าไม่คิดจะยอมแพ้ แม้จะเป็นเพียงชาวบ้านธรรมดาที่ไร้พรสวรรค์ ข้าก็จะเป็นผู้ที่กำราบจอมมารและช่วยเหลือเจ้าหญิงให้ได้ ตอนนี้ในใจมีเพียงคำถามเดียว: จะยอมจำนนต่อโชคชะตา หรือจะลุกขึ้นสู้?

การตัดสินใจครั้งแรกด้วย if-else
note
การแตกกิ่งด้วย if-else ในภาษา Rust คล้ายกับภาษาอื่นๆ แต่มีข้อแตกต่างคือ เงื่อนไข Boolean ไม่จำเป็นต้องอยู่ในวงเล็บ และแต่ละเงื่อนไขจะตามด้วยบล็อกของโค้ด นอกจากนี้ if-else ยังเป็น expression ที่ทุกกิ่งต้องส่งค่ากลับเป็นชนิดเดียวกัน
>
fn main() {
    let my_strength = 5;
    let demon_power = 100;

    if my_strength > demon_power {
        println!("This is impossible... I'm too weak");
    } else {
        println!("Even though I'm weak... I won't give up!");
    }
}
จุดเริ่มต้นของการต่อต้านด้วย if let
note
ในบางกรณีการใช้ match เพื่อตรวจสอบค่าใน enum อาจจะเขียนยาวเกินไป if let จึงเป็นทางเลือกที่ช่วยให้เขียนโค้ดได้กระชับและอ่านง่ายขึ้น
>
fn main() {
    let ancient_book: Option<&str> = Some("The Forbidden Scroll");

    if let Some(book) = ancient_book {
        println!("'{}'... The only way the commoner can fight the demon lord", book);
    } else {
        println!("There's no way out anymore...");
    }
}
ตัวอย่างการโค้ดเดิมที่ใช้ match
fn main() {
    let ancient_book: Option<&str> = Some("The Forbidden Scroll");

    match ancient_book {
        Some(book) => println!("'{}'... The only way the commoner can fight the demon lord", book),
        None => println!("There's no way out anymore..."),
    }
}
note
if let สามารถใช้กับ enum ได้เช่นกัน ทำให้การตรวจสอบค่าใน enum ทำได้ง่ายและกระชับขึ้น
>
enum Hero {
    Novice(u32),
    Specialist(String),
    Legendary,
}

fn main() {
    let hero = Hero::Novice(5);

    // ใช้ match
    match hero {
        Hero::Novice(power) => println!("Novice Hero, Power: {}", power),
        Hero::Specialist(weapon) => println!("Specialist Hero, Weapon: {}", weapon),
        Hero::Legendary => println!("Legendary Hero"),
    }

    // ใช้ if let ที่กระชับกว่า
    if let Hero::Novice(power) = hero {
        println!("Novice Hero, Power: {}", power);
    }

    // ตัวอย่างเพิ่มเติม
    let legendary = Hero::Legendary;
    if let Hero::Legendary = legendary {
        println!("Hero in the legend has appeared!");
    }
}
แบบฝึกหัดแห่งการเริ่มต้น:
บททดสอบความกล้าหาญ
ให้เติม syntax ที่ถูกต้องลงในช่องว่าง
fn main() {
    let fear_level = 10;

    ____ fear_level > 7 {
        println!("Fear is overwhelming...");
    } ____ fear_level > 3 {
        println!("I must overcome my fear!");
    } ____ {
        println!("I'm not afraid! I'm ready to face the demon lord!");
    }
}
บททดสอบการค้นพบ
ให้เติม syntax ที่ถูกต้องลงในช่องว่าง
fn main() {
    let forbidden_scroll: Option<&str> = Some("The Way to Defeat the Demon Lord");

    if let ____ = forbidden_scroll {
        println!("Found hope in the scroll: {}", scroll);
    } else {
        println!("The scroll is empty... hope is still lost");
    }
}
บททดสอบการเลือกเส้นทาง
ให้เติม syntax ที่ถูกต้องลงในช่องว่าง
enum Path {
    Fight(u8),
    Hide,
    Surrender,
}

fn main() {
    let chosen_path = Path::Fight(9);

    if let Path::Fight(risk_level) = ____ {
        if ____ > 8 {
            println!("This path is too risky... but it's the only way");
        } else {
            println!("Risk level: {} - Still hopeful", ____);
        }
    } else if let Path::Hide = chosen_path {
        println!("Hiding is not an option... the princess is waiting");
    } else {
        println!("Giving up is a disservice to everyone's hope");
    }
}
"แม้จะเป็นเพียงคนธรรมดา แต่ข้าจะพิสูจน์ว่าโชคชะตาไม่ใช่สิ่งที่กำหนดไว้ตายตัว... ข้าจะต้องแข็งแกร่งขึ้น และเพื่อให้ทำเช่นนั้นได้ ข้าต้องฝึกฝนอย่างไม่มีที่สิ้นสุด..."

ติดตามการผจญภัยต่อใน บทที่ 2: วงจรแห่งการฝึกฝน ที่จะเผยถึงวิธีที่คนธรรมดาจะก้าวข้ามขีดจำกัดของตัวเอง...
บทที่ 2: วงจรแห่งการฝึกฝน
"การเป็นคนธรรมดาไม่ใช่ข้อจำกัด แต่เป็นแรงผลักดัน... ข้าจะฝึกฝนจนกว่าร่างกายจะพัง จะล้มแล้วลุกอีกครั้ง จนกว่าจะแข็งแกร่งพอที่จะต่อกรกับจอมมาร"

การฝึกฝนไม่มีที่สิ้นสุด (loop)
note
loop เป็นคำสั่งที่ทำให้การทำงานวนซ้ำไม่มีที่สิ้นสุด จนกว่าจะมีคำสั่ง break หรือมีข้อยกเว้นอื่นๆ เช่น return หรือ panic! เพื่อหยุดการทำงาน
>
fn main() {
    let mut training_days = 0;
    let mut strength = 1;

    loop {
        println!("Day {}: Training until exhaustion...", training_days);
        training_days += 1;
        strength += 1;

        if strength >= 100 {
            println!("After {} days, I'm finally strong enough", training_days);
            break;
        }
    }
}
การฝึกทักษะหลายด้าน (for)
note
for ใช้สำหรับการวนซ้ำผ่านข้อมูลที่เป็น Iterator เช่น Range, Array, Vector หรือ Collection อื่นๆ โดยจะทำงานจนกว่าจะครบทุกรายการ หรือมีคำสั่ง break เพื่อหยุดการทำงาน
>
fn main() {
    let skills = vec!["Sword", "Bow", "Magic", "Fighting"];

    // วนลูปผ่าน Vector
    for skill in skills {
        println!("Training skill: {}", skill);
    }

    // วนลูปผ่าน Range
    for i in 0..3 {
        println!("Training round: {}", i + 1);
    }
}
tip
iter - เป็นการยืมข้อมูลแต่ละตัวมาใช้ในการวนลูป โดยไม่มีผลกระทบต่อข้อมูลต้นฉบับ ทำให้สามารถนำข้อมูลกลับมาใช้ซ้ำได้หลังจากลูปเสร็จ
into_iter - เป็นการนำข้อมูลมาใช้แบบใช้แล้วหมดไป เมื่อวนลูปเสร็จจะไม่สามารถนำข้อมูลกลับมาใช้ได้อีก เพราะข้อมูลถูก 'ย้าย' ไปใช้ได้ในลูปแล้ว
iter_mut - เป็นการยืมข้อมูลแบบแก้ไขได้ ทำให้สามารถเปลี่ยนแปลงค่าของข้อมูลภายในลูปได้
>
fn main() {
    let mut skills = vec![
        String::from("Sword"),
        String::from("Bow"),
        String::from("Magic"),
        String::from("Fighting"),
    ];

    for skill in skills.iter() {
        println!("Training skill: {}", skill);
    }

    for skill in skills.iter_mut() {
        *skill = skill.to_uppercase();
        println!("Training skill: {}", skill);
    }

    for skill in skills.into_iter() {
        println!("Training skill: {}", skill);
    }
}
การฝึกจนกว่าจะสำเร็จ (while)
note
while ใช้สำหรับการวนซ้ำจนกว่าจะเกิดเหตุการณ์ที่ต้องการ เช่น การตรวจสอบความสำเร็จหรือการตรวจสอบสถานะของตัวแปรใดๆ จนกว่าจะสำเร็จ
>
fn main() {
    let mut success_rate = 0;

    while success_rate < 100 {
        println!("Success rate: {}% - Not enough... keep training", success_rate);
        success_rate += 10;
    }
}
การเรียนรู้คัมภีร์โบราณ (while let)
note
เช่นเดียวกับ if let, while let สามารถทำให้การเขียนลำดับของ match ที่ดูยุ่งยากให้เขียนได้ง่ายขึ้น
>
fn main() {
    let mut ancient_techniques: Vec<Option<&str>> = vec![
        Some("Sword Mastery"),
        Some("Fighting Art"),
        Some("Spell of Annihilation"),
    ];

    while let Some(Some(technique)) = ancient_techniques.pop() {
        println!("Learning {}: One step closer to defeating the demon lord", technique);
    }
}
tip
การใช้ Some ซ้อนกัน 2 ชั้นในที่นี้มีเหตุผลดังนี้:
- Some ชั้นแรก มาจากการที่
pop()จะคืนค่าเป็นOptionเสมอ (Some เมื่อมีข้อมูล, None เมื่อ vector ว่างเปล่า) - Some ชั้นที่สอง คือตัวข้อมูลในแต่ละช่องของ vector ที่เราประกาศเป็น
Option<&str>>
แบบฝึกหัดการฝึกฝน:
บททดสอบความอดทน
ให้เติม syntax ที่ถูกต้องลงในช่องว่าง
fn main() {
    // เติมการฝึกซ้ำๆ จนกว่าจะครบ 100 ครั้ง
    for count in ____ {
        println!("Training sword: {}", count);
    }
}
บททดสอบการฝึกต่อเนื่อง
ให้เติม syntax ที่ถูกต้องลงในช่องว่าง
fn main() {
    let mut stamina = 100;

    ____ stamina > 0 {
        println!("Stamina: {}", stamina);
        stamina -= 10;

        if stamina <= 0 {
            println!("Exhausted... but I must keep fighting");
            ____;
        }
    }
}
บททดสอบการเอาชนะขีดจำกัด
ให้เติม syntax ที่ถูกต้องลงในช่องว่าง
fn training_to_surpass_limits(days: u32) -> (u32, u32) {
    let mut power = 1;
    let mut knowledge = 0;

    for day in 1..=days {
        ____ {
            if power >= 1000 {
                println!("Day {}: Overcome human limits", day);
                ____;
            }

            power *= 2;
            knowledge += 1;

            if knowledge % 10 == 0 {
                println!("Learning new secrets!");
            }
        }
    }

    (power, knowledge)
}

fn main() {
    let (final_power, total_knowledge) = training_to_surpass_limits(30);
    println!("Power: {} | Knowledge: {}", final_power, total_knowledge);
}
"ทุกหยดเหงื่อ ทุกหยดเลือด ล้วนนำข้าเข้าใกล้เป้าหมายมากขึ้น... แต่การฝึกฝนอย่างเดียวไม่พอ ข้าต้องเรียนรู้ที่จะเผชิญหน้ากับศัตรูที่แข็งแกร่งกว่า..."

ติดตามการผจญภัยต่อใน บทที่ 3: การเผชิญหน้ากับศัตรู ที่จะเผยถึงวิธีการรับมือกับภัยคุกคามที่หลากหลาย...
บทที่ 3: การเผชิญหน้ากับศัตรู
"หลังจากฝึกฝนมาอย่างหนัก ข้าได้เรียนรู้ว่าศัตรูมีหลากหลายรูปแบบ... การจะเอาชนะจอมมารได้ ข้าต้องเรียนรู้ที่จะรับมือกับทุกสถานการณ์"

การวิเคราะห์คู่ต่อสู้ (Pattern Matching)
note
Rust มีการจับคู่รูปแบบผ่านคีย์เวิร์ด match ซึ่งใช้งานคล้ายกับ switch ใน C หรือ JavaScript โดยจะประเมินกิ่งแรกที่ตรงกับรูปแบบ และต้องครอบคลุมทุกค่าที่เป็นไปได้
>
enum Enemy {
    Goblin(u32),
    DarkKnight(u32),
    Dragon(u32, u32),
    DemonLord,
}

fn analyze_enemy(enemy: Enemy) -> String {
    match enemy {
        Enemy::Goblin(attack) => {
            format!("Just a common goblin. Attack power: {}", attack)
        }
        Enemy::DarkKnight(defense) => {
            format!("Dark knight. Defense power: {}", defense)
        }
        Enemy::Dragon(attack, defense) => {
            format!("Dragon! Attack power: {}, Defense power: {}", attack, defense)
        }
        Enemy::DemonLord => String::from("Demon lord... the true enemy")
    }
}

fn main() {
    let enemy = Enemy::Dragon(100, 50);
    println!("{}", analyze_enemy(enemy));
}
tip
format!() เป็นฟังก์ชันที่ใช้สำหรับการจัดรูปแบบข้อความ ซึ่งจะส่งคืน String ที่จัดรูปแบบแล้ว โดยสามารถรวมตัวแปรหรือค่าต่างๆ ได้อย่างง่ายดาย
>
การเลือกอาวุธ (Weapon Selection)
enum Weapon {
    Sword(u32),
    Bow(u32, u32),
    Magic(String),
    None,
}

fn choose_weapon(weapon: &Weapon) -> &str {
    match weapon {
        Weapon::Sword(power) if *power > 100 => "Sword Mastery!",
        Weapon::Sword(_) => "Basic Sword",
        Weapon::Bow(power, range) if *power > 50 && *range > 100 => "Bow of Light!",
        Weapon::Bow(_, _) => "Wooden Bow",
        Weapon::Magic(spell) => {
            match spell.as_str() {
                "fire" => "Fire Magic",
                "ice" => "Ice Magic",
                _ => "Basic Magic"
            }
        }
        Weapon::None => "No weapon... must fight with bare hands"
    }
}

fn main() {
    let weapon = Weapon::Magic(String::from("fire"));
    println!("{}", choose_weapon(&weapon));
}
แบบฝึกหัดการต่อสู้:
บททดสอบการวิเคราะห์ศัตรู
ให้เติม syntax ที่ถูกต้องลงในช่องว่าง
enum Monster {
    Slime(u32),
    Wolf(bool),
    Undead(String),
}

fn analyze_monster(monster: Monster) -> String {
    ____ monster {
        Monster::____ => format!("Size of it: {}", size),
        Monster::____ => {
            if is_strong {
                format!("Strong wolf")
            } else {
                format!("Basic wolf")
            }
        }
        Monster::____ => format!("Type of it: {}", type_),
    }
}

fn main() {
    let monster = Monster::Wolf(true);
    println!("{}", analyze_monster(monster));
}
บททดสอบการประเมินสถานการณ์
ให้เติม syntax ที่ถูกต้องลงในช่องว่าง
enum Situation {
    Ambush(u32),
    Trap(String, bool),
    Boss(u32, u32, u32),
}

fn evaluate_situation(situation: Situation) -> String {
    ____ situation {
        Situation::____ if count > 10 => format!("There are many enemies in this area"),
        Situation::Ambush(_) => format!("There are enemies in this area"),
        Situation::Trap(trap_type, triggered) => format!("There is a {} trap in this area", trap_type),
        Situation::____ => format!("The enemy is a demon lord with attack {}, defense {}, and health {}", atk, def, hp),
    }
}

fn main() {
    let situation = Situation::Boss(100, 50, 1000);
    println!("{}", evaluate_situation(situation));
}
บททดสอบการต่อสู้กับจอมมาร
ให้เติม syntax ที่ถูกต้องลงในช่องว่าง
enum DemonLordPhase {
    Phase1(u32),
    Phase2(u32, String),
    FinalPhase(bool),
}

fn battle_demon_lord(phase: DemonLordPhase, hero_power: u32) -> Result<String, String> {
    ____ phase {
        DemonLordPhase::Phase1(power) if hero_power > power => Ok("Demon lord's power is not that strong...".to_string()),
        DemonLordPhase::Phase1(_) => Err("Demon lord's power is not that strong...".to_string()),
        DemonLordPhase::Phase2(power, ultimate) => {
            ____ ultimate.as_str() {
                "DarkDestruction" if hero_power > power * 2 => Ok("Demon lord's power is not that strong...".to_string()),
                _ => Err("Demon lord's power is not that strong...".to_string()),
            }
        }
        DemonLordPhase::____ => {
            if all_out {
                Ok("Demon lord used all his power...".to_string())
            } else {
                Err("Demon lord still has power...".to_string())
            }
        }
    }
}

fn main() {
    let phase = DemonLordPhase::FinalPhase(true);
    println!("{}", battle_demon_lord(phase, 100).unwrap());
}
"การเผชิญหน้ากับศัตรูทำให้ข้าเข้าใจว่า... การมีพลังอย่างเดียวไม่พอ ข้าต้องรู้จักใช้สติปัญญาและกลยุทธ์ในการต่อสู้ด้วย..."

ติดตามการผจญภัยต่อใน บทที่ 4: การร่ายคาถา ที่จะเผยถึงวิธีการใช้พลังพิเศษผ่านการเขียนฟังก์ชัน...
บทที่ 4: การร่ายคาถา
"ในที่สุดข้าก็เข้าใจ... การจะเอาชนะจอมมารไม่ใช่แค่การมีพลังมากกว่า แต่เป็นการรู้จักผสมผสานพลังและความรู้เข้าด้วยกัน เหมือนการร่ายคาถาที่ต้องร้อยเรียงท่วงท่าและคำพูดให้สมบูรณ์แบบ"

คาถาพื้นฐาน (Basic Functions)
note
ฟังก์ชันถูกประกาศโดยใช้คีย์เวิร์ด fn โดย argument ต้องระบุชนิดข้อมูล (type annotation) เช่นเดียวกับตัวแปร และถ้าฟังก์ชันต้องการส่งค่ากลับ จะต้องระบุชนิดข้อมูลที่ส่งกลับหลังเครื่องหมายลูกศร ->
นิพจน์สุดท้ายในฟังก์ชันจะถูกใช้เป็นค่าที่ส่งกลับ หรือสามารถใช้คำสั่ง return เพื่อส่งค่ากลับก่อนจบฟังก์ชันได้ แม้จะอยู่ภายในลูปหรือเงื่อนไข if ก็ตาม
>
fn summon_power(base_power: u32, multiplier: u32) -> u32 {
    let total_power = base_power * multiplier;
    println!("Collecting power {} units", total_power);
    total_power
}

fn main() {
    let power = summon_power(100, 5);
    println!("Total power: {}", power);
}
คาถาป้องกัน
fn create_barrier(power: u32, name: &str) -> String {
    // ตัวอย่าง return แบบเต็ม
    if power > 100 {
        return format!("Create barrier {}: Protection power {}", name, power);
    }

    // ตัวอย่าง return แบบย่อ (ละคำสั่ง return)
    format!("Create barrier {}: Protection power {}", name, power)
}

fn main() {
    println!("{}", create_barrier(150, "Magic"));
    println!("{}", create_barrier(50, "Element"));
}
คาถาผสาน (Function Composition)
fn enchant_weapon(weapon_name: &str) -> String {
    format!("{}", weapon_name)
}

fn add_elemental_power(weapon: String, element: &str) -> String {
    format!("{} of {}", weapon, element)
}

fn main() {
    let basic_weapon = enchant_weapon("Dragon");
    let powered_weapon = add_elemental_power(basic_weapon, "Fire");
    println!("{} created!", powered_weapon);
}
แบบฝึกหัดการร่ายคาถา:
บททดสอบการรวมพลัง
ให้เติม syntax ที่ถูกต้องลงในช่องว่าง
// เติมฟังก์ชันให้สมบูรณ์
fn combine_elements(____: &str, ____: &str) -> String {
    format!("Combine {} and {} elements: {}", ____, ____, ____)
}

fn main() {
    println!("{}", combine_elements("Fire", "Wind"));
    // Should show: "Combine Fire and Wind elements: FireWind"
}
บททดสอบการสร้างคาถาต่อเนื่อง
ให้เติม syntax ที่ถูกต้องลงในช่องว่าง
fn charge_power(____: u32) -> u32 {
    ____
}

fn release_spell(____: u32, ____: &str) -> String {
    format!("Release power {} units on {}", ____, ___)
}

fn main() {
    let charged_power = charge_power(50);
    let spell_result = release_spell(charged_power, "Demon lord");
    println!("{}", spell_result);
    // Should show: "Release power 150 units on Demon lord!"
}
บททดสอบการสร้างคาถาสุดท้าย
ให้เติม syntax ที่ถูกต้องลงในช่องว่าง
enum MagicResult {
    Success(String),
    Failure(String),
    Backfire(u32),
}

fn cast_ultimate_spell(
    power: u32,
    skill: u32,
    mana: u32
) -> Result<MagicResult, String> {
    if ____ < 100 {
        return Err("Not enough mana...".to_string());
    }

    ____ (power, skill) {
        (____, ____) if ____ > 1000 && s > 100 => Ok(MagicResult::Success(format!("Release power {} units on {}", power, skill))),
        (p, _) if p > 500 => Ok(MagicResult::Success(format!("Release power {} units on {}", power, skill))),
        _ => Err(format!("Not enough mana..."))
    }
}

fn main() {
    match cast_ultimate_spell(1200, 120, 150) {
        Ok(MagicResult::Success(msg)) => println!("Success! {}", msg),
        Ok(MagicResult::Failure(msg)) => println!("Failed: {}", msg),
        Ok(MagicResult::Backfire(damage)) => println!("Spell backfired! Take {} damage", damage),
        Err(e) => println!("Cannot cast spell: {}", e),
    }
}
"ทุกคาถาที่ข้าเรียนรู้ ทุกพลังที่ข้าได้รับ ล้วนนำข้าเข้าใกล้จุดหมายมากขึ้น... แต่การเดินทางยังไม่จบ ข้าต้องเรียนรู้ที่จะรับมือกับความล้มเหลวที่อาจเกิดขึ้น..."

ติดตามการผจญภัยต่อใน บทที่ 5: การเผชิญหน้าครั้งสุดท้าย ที่จะเผยถึงวิธีการรับมือกับอุปสรรคและความผิดพลาดที่อาจเกิดขึ้น...
บทที่ 5: การเผชิญหน้าครั้งสุดท้าย
"ในที่สุดวันนี้ก็มาถึง... วันที่ข้าต้องเผชิญหน้ากับจอมมาร การต่อสู้ครั้งนี้จะไม่มีโอกาสให้ผิดพลาด ทุกการตัดสินใจ ทุกการเคลื่อนไหว ต้องสมบูรณ์แบบ"

note
Error handling
การจัดการข้อผิดพลาด คือวิธีการรับมือกับสถานการณ์ที่โปรแกรมอาจทำงานผิดพลาด เช่น ถ้าโปรแกรมอ่านไฟล์ไม่สำเร็จแล้วพยายามใช้ข้อมูลที่อ่านไม่ได้นั้นต่อ มันก็จะเกิดปัญหาแน่นอน การที่เราสังเกตและจัดการกับข้อผิดพลาดอย่างชัดเจน จะช่วยป้องกันปัญหาต่างๆ ที่อาจเกิดขึ้นในโปรแกรม
ในภาษา Rust มีวิธีจัดการข้อผิดพลาด 3 แบบหลักๆ:
panic- ใช้เมื่อเจอข้อผิดพลาดร้ายแรงที่แก้ไขไม่ได้- เหมาะสำหรับการเขียน Test
- ใช้ตอนทำต้นแบบโปรแกรม (prototype)
Option- ใช้เมื่อค่าอาจมีหรือไม่มีก็ได้unwrapใช้ได้เมื่อแน่ใจ 100% ว่าต้องมีค่าexpectแนะนำให้ใช้ expect ดีกว่าเพราะระบุข้อความแจ้งเตือนได้
Result- ใช้เมื่อการทำงานอาจล้มเหลวและต้องให้ผู้เรียกจัดการปัญหา- เหมาะกับงานที่มีโอกาสผิดพลาดสูง
- ไม่ควรใช้ unwrap/expect ยกเว้นตอน Test หรือทำ prototype
สรุปง่ายๆ:
- ถ้าแก้ไขไม่ได้เลย -> ใช้
panic - ถ้าอาจมีหรือไม่มีค่า -> ใช้
Option - ถ้ามีโอกาสผิดพลาดและต้องจัดการ -> ใช้
Result
การรับมือกับความล้มเหลว (Result)
#[derive(Debug)]
enum BattleError {
    OutOfMana(u32),
    WeaponBroke,
    TooExhausted,
}

fn strike_demon_lord(power: u32, mana: u32) -> Result<String, BattleError> {
    if mana < 50 {
        return Err(BattleError::OutOfMana(50 - mana));
    }

    match power {
        0..=100 => Err(BattleError::TooExhausted),
        101..=500 => Ok("Attack successful! Demon lord is injured".to_string()),
        _ => Ok("Explosion! Demon lord is severely injured!!".to_string())
    }
}

fn main() {
    let result = strike_demon_lord(100, 40);
    match result {
        Ok(msg) => println!("{}", msg),
        Err(e) => println!("Failed: {:?}", e)
    }
}
การไม่ยอมแพ้ต่อโชคชะตา (Option)
#[allow(dead_code)]
fn find_princess(castle_level: u32) -> Option<String> {
    match castle_level {
        7 => Some("Found princess! She is in the top room".to_string()),
        _ => None
    }
}

fn main() {
    // ทดสอบ unwrap() - จะทำงานได้เพราะ level = 7
    let result1 = find_princess(7).unwrap();
    println!("{}", result1);

    // ทดสอบ expect() - จะ panic พร้อมข้อความที่กำหนด
    let result2 = find_princess(1)
        .expect("Error: Princess not found");
    println!("{}", result2);
}
การต่อสู้ครั้งสุดท้าย (Final Battle)
#[derive(Debug)]
enum DemonLordAttack {
    DarkDestruction,
    SoulDrain,
    EndOfWorld,
}

fn face_demon_lord(
    hero_power: u32,
    hero_mana: u32,
    princess_rescued: bool
) -> Result<String, String> {
    if !princess_rescued {
        return Err("Not found! Must rescue princess first!".to_string());
    }

    if hero_mana == 0 {
        return Err("Out of mana... everything is over".to_string());
    }

    match hero_power {
        power if power > 1000 => Ok("Victory! Demon lord is defeated!".to_string()),
        power if power > 500 => Ok("We did it! Even though severely injured...".to_string()),
        _ => Err("Not enough power... but I won't give up!".to_string())
    }
}

fn main() {
    let result = face_demon_lord(100, 40, true);
    match result {
        Ok(msg) => println!("{}", msg),
        Err(e) => println!("Failed: {}", e)
    }
}
แบบฝึกหัดการต่อสู้ครั้งสุดท้าย:
บททดสอบการกล้าเผชิญหน้า
ให้เติม syntax ที่ถูกต้องลงในช่องว่าง
fn challenge_demon_lord(power: u32) -> Result<String, String> {
    match power {
        0..=100 => ____("Not enough power... I won't give up!".to_string()), //should be Error
        101..=500 => Ok("I will defeat you!".to_string()),
        _ => Ok("I will defeat you!".to_string())
    }
}

fn main() {
    match challenge_demon_lord(100) {
        ____ => println!("{}", msg),
        ____ => println!("Failed: {}", e)
    }
}
บททดสอบการช่วยเหลือเจ้าหญิง
ให้เติม syntax ที่ถูกต้องลงในช่องว่าง
#[derive(Debug)]
enum RescueError {
    GuardTooStrong,
    WrongLocation,
    TrappedInside,
}

fn rescue_princess(
    location: u32
) -> Result<String, RescueError> {
    match location {
        7 => Ok("Found princess! She is in the top room".to_string()),
        _ => ____(RescueError::WrongLocation)
    }
}

fn main() {
    let result = rescue_princess(1);
    match result {
        ____ => println!("{}", msg),
        ____ => println!("Failed: {:?}", e)
    }
}
บททดสอบการต่อสู้ครั้งสุดท้าย
ให้เติม syntax ที่ถูกต้องลงในช่องว่าง
struct Hero {
    power: u32,
    mana: u32,
    courage: u32,
}

fn final_battle(hero: Hero) -> Result<String, String> {
    if hero.courage < 100 {
        return ____("Fear is overwhelming...".to_string());
    }

    match (hero.power, hero.mana) {
        (p, m) if p > 1000 && m > 500 => Ok("Victory! Demon lord is defeated!".to_string()),
        (p, _) if p > 750 => Ok("We did it! Even though severely injured...".to_string()),
        (_, m) if m > 1000 => Ok("Not enough power... but I won't give up!".to_string()),
        _ => ____("There is no way... this is the end of my power".to_string())
    }
}

fn main() {
    let result = final_battle(Hero { power: 1000, mana: 500, courage: 100 });
    match result {
        ____ => println!("{}", msg),
        ____ => println!("Failed: {}", e)
    }
}
"ในที่สุดทุกอย่างก็จบลง... จอมมารพ่ายแพ้ เจ้าหญิงได้รับการช่วยเหลือ และข้า - ชาวบ้านธรรมดาที่ไม่เคยคิดว่าตัวเองจะทำได้ ได้พิสูจน์ให้เห็นว่าแม้แต่คนธรรมดาก็สามารถเอาชนะโชคชะตาได้ ถ้ามีความมุ่งมั่นและไม่ยอมแพ้..."
"การผจญภัยครั้งนี้สอนให้ข้ารู้ว่า ไม่มีความล้มเหลวใดที่จะหยุดยั้งผู้ที่ไม่ยอมแพ้ได้ แม้จะเป็นเพียงคนธรรมดา แต่หัวใจที่กล้าหาญและความมุ่งมั่นที่จะเอาชนะข้อจำกัดของตัวเอง คือพลังที่ยิ่งใหญ่ที่สุด..."

จบบริบูรณ์.
- Ownership & Borrowing
Ownership & Borrowing
note
Rust สามารถจัดการหน่วยความจำได้อย่างมีประสิทธิภาพและปลอดภัยสูง
เนื่องจากมีกฎการจัดการหน่วยความจำที่เข้มงวด เรียกว่า Ownership & Borrowing
กฎ Ownership & Borrowing ทำหน้าที่หลักๆดังนี้:
- ตรวจสอบ,ควบคุมการเข้าถึงหน่วยความจำ เพื่อให้แน่ใจว่าสามารถเข้าถึง, ใช้งาน และคืนค่าหน่วยความจำได้อย่างปลอดภัย
- ป้องกันการ Copy ข้อมูลใน Heap โดยไม่จำเป็น ทำให้โปรแกรมมีประสิทธิภาพมากขึ้น
- ป้องกันการแก้ไขหน่วยความจำจากหลายที่พร้อมกัน (Race Condition)
- คืนหน่วยความจำโดยอัตโนมัติได้อย่างปลอดภัยเมื่อตัวแปรออกจาก scope
ข้อดีของระบบนี้:
- ไม่จำเป็นต้องใช้ Garbage Collector เหมือนภาษาสมัยใหม่อื่นๆ
- ไม่ต้องจัดการหน่วยความจำด้วยตนเองเหมือน C หรือ C++
- สามารถดักจับข้อผิดพลาดที่เกี่ยวกับหน่วยความจำได้ตั้งแต่ตอน Compile Time
- สามารถแนะนำวิธีการเขียนโปรแกรมได้อย่างมีประสิทธิภาพและปลอดภัยมากขึ้น (และทำให้เกิดนิสัยของการเขียนโปรแกรมที่ดีขึ้น)
- ลดข้อผิดพลาดที่เกี่ยวกับหน่วยความจำได้มากกว่า 80% เมื่อเทียบกับ C และ C++ เช่น:
- Null Pointer Dereference
- Double Free
- Use After Free
- Race Condition
- Memory Leak
- และอื่นๆ
Ownership & Borrowing Rules
Ownership & Borrowing มีกฎอยู่ 8 ข้อ โดยเป็นกลุ่มของ Ownership 3 ข้อ และ Borrowing
5 ข้อ ดังนี้:
Ownership
1. Each value has a single owner at a time
tip
- เป็นรากฐานของกฎในข้ออื่นๆ
- เพื่อให้มั่นใจว่าข้อมูลจะถูกเข้าถึงได้อย่างปลอดภัยได้จากที่เดียวเท่านั้น (Single source of truth)
- Memory จะถูก Deallocated ได้ถูกที่ถูกเวลาได้อย่างปลอดภัย และเพื่อป้องกันการ Double Free จากการมีตัวแปรหลายตัวชี้ไปยัง Memory เดียวกัน
2. Ownership can be transferred (move semantics)
tip
- การย้าย Ownership ไปยังตัวแปรใหม่ จะทำให้ตัวแปรที่เป็น Owner เดิม ไม่สามารถเข้าถึงข้อมูลได้อีกต่อไป
Example 1 + 2:
fn main() {
    // s1 เป็น Owner ของ value "Hello"
    let s1 = String::from("Hello");

    // Ownership ของ "Hello" ถูกย้ายจาก s1 มายัง s2 (กฎ move semantics จากข้อ 2)
    let s2 = s1;

    // จะเกิด error เนื่องจาก value "Hello" ถูก move ownership ไปไว้ที่ s2 แล้ว
    println!("Say: {}", s1);
}

รูปประกอบตัวอย่างที่ 1 + 2
3. When the owner goes out of scope, the value is dropped
tip
- Scope ใน Rust หมายถึง Block
{}ของ code ไม่ว่าจะเป็นfn,if,loop,for, หรืออื่นๆ - สามารถการันตีได้ว่า Memory จะถูก Deallocated ได้ถูกที่ถูกเวลาได้อย่างปลอดภัยโดยอัตโนมัติ
- ไม่จำเป็นต้องใช้ Garbage Collector หรือ Manual Deallocation
- ทำให้ Rust มี Memory Footprint ที่น้อยมากๆ
- สามารถป้องกันการเกิด Memory Leak, Double Free, Use After Free ได้อย่างมีประสิทธิภาพสูงสุด
Example 3:
fn main() { // ---+---> Scope fn main
    // s1 เป็น Owner ของ value "Hello"
    let s1 = String::from("Hello");

    // Ownership ของ "Hello" ถูกย้ายจาก s1 มายัง argument ของ fn print_string
    print_string(s1);
    // Value "Hello" จะถูก drop ทันทีที่จบการทำงานของ fn print_string
    // โดยไม่ต้องรอจบการทำงานของ scope หลัก (fn main)

    { // ---+---> Scope block
        let s2 = String::from("Hello");
    } // <--- s2 จะถูก drop ทันทีตรงนี้

    /* Do other stuff */
}

fn print_string(s: String) { // ---+---> Scope fn print_string
    println!("{}", s);
} // <--- Value "Hello" จะถูก drop ทันทีตรงนี้
Borrowing
4. Ownership can be borrowed (references)
tip
- วิธีการยืมข้อมูลจาก Owner มาชั่วคราว (Borrowing)
ทำได้โดยการสร้างตัวแปรใหม่ที่เป็นตัวแปรอ้างอิง (Reference หรือ
&) ซึ่งจะชี้ไปยังข้อมูลที่มีอยู่ในหน่วยความจำ - Owner เดิมจะไม่สูญเสีย Ownership ไป
- วิธีนี้จะทำให้เข้าถึงข้อมูลได้อย่างมีประสิทธิภาพสูงสุด เนื่องจากไม่ต้อง Copy ข้อมูลทั้งก้อนจาก Heap ไปยังตัวแปรใหม่ และข้อมูลยังคงมีเพียงที่เดียวเหมือนเดิม
Example 4:
fn main() {
    let s1 = String::from("Hello");

    // ยืมข้อมูลจาก s1 มาชั่วคราวโดยไม่ต้องย้าย Ownership
    let s2 = &s1;

    // สามารถยืมข้อมูลจาก s1 ได้หลายตัว
    let s3 = &s1;

    // หรือสามารถ Copy Memory Address จาก s2 ไปยัง s4 ตรงๆแบบนี้ก็ได้
    let s4 = s2;

    print_string(s2);

    // จะเกิด error เนื่องจาก fn print_string ต้องการ argument ที่เป็นตัวแปรอ้างอิงเท่านั้น
    print_string(s1);
}

// หากต้องการใช้ argument ที่เป็นตัวแปรอ้างอิง จำเป็นต้องประกาศ type ให้เป็น `&` ด้วย
fn print_string(s: &String) {
    println!("{}", s);
}
5. Immutable borrows allow many references at a time
tip
- สามารถ immutable borrow ได้หลายตัวเท่านั้น
Example 5:
fn main() {
    let s1 = String::from("Hello");

    // สามารถ immutable borrow s1 ได้หลายตัว
    let s2 = &s1;
    let s3 = &s1;
    let s4 = &s1;

    println!("s2: {}, s3: {}, s4: {}", s2, s3, s4);
}
6. Mutable borrow allows only one reference
tip
- หากต้องการใช้ mutable borrow ต้องประกาศตัวแปร Owner เป็น
mutก่อนเท่านั้น
Example 6:
fn main() {
    // จำเป็นต้องประกาศ Owner เป็น `mut` ก่อน ถึงจะสามารถ mutable borrow ได้
    let mut s1 = String::from("Hello");

    // สามารถ mutable borrow s1 ได้หนึ่งตัวเท่านั้น
    let s2 = &mut s1;
    // error: cannot borrow `s1` as mutable more than once at a time
    // let s3 = &mut s1;

    println!("s2: {}", s2);
}
7. Mutable and immutable references cannot coexist
tip
- เพื่อป้องกันความ inconsistent state ระหว่าง Reader และ Writer, ทำให้รับประกันได้ว่าข้อมูลจะไม่ถูกแก้ไขระหว่างการที่มีการ Read อยู่
Example 7:
fn main() {
    let mut s1 = String::from("Hello");

    let s2 = &s1;
    let s3 = &mut s1;
    // error: cannot borrow `s1` as immutable because it is also borrowed as mutable

    println!("s2: {}, s3: {}", s2, s3);
}
8. References must be valid (lifetime)
tip
- Rust มีความสามารถกำหนด Lifetime ของตัวแปรอ้างอิงได้อย่างชัดเจน
- Lifetime คือ ช่วงเวลาที่ตัวแปรอ้างอิงยังคงมีอยู่ในหน่วยความจำ
- Lifetime จะช่วยให้ Compiler ตรวจสอบว่าตัวแปรอ้างอิงยังคงมีอยู่ในหน่วยความจำหรือไม่ ตั้งแต่ตอน Compile Time
- Lifetime ช่วยป้องกัน dangling references โดยรับประกันว่าข้อมูลที่ถูกอ้างอิงจะมีอายุยาวนานกว่าหรือเท่ากับตัวแปรที่อ้างอิงถึงมัน
- Rust มักจะสามารถอนุมาน lifetime ได้โดยอัตโนมัติ แต่บางครั้งเราอาจต้องระบุ lifetime
ด้วยตนเองโดยใช้ syntax เช่น
'a,'b - การใช้ lifetime ที่ถูกต้องช่วยให้เราสามารถสร้างและใช้งานโครงสร้างข้อมูลที่ซับซ้อนซึ่งมีการอ้างอิงถึงกันและกันได้อย่างปลอดภัย
Example 8.1: Struct with lifetime
#[derive(Debug)]
struct Person<'a> { // 'a คือ lifetime ของตัวแปรอ้างอิง
    name: String,
    age: u8,
    friend: Option<&'a Person<'a>>,
}

fn main() {
    let person;                         // --------------+---> 'person
                                        //               |
    {                                   //               |
        let friend = Person {           // ---+---> 'freind
            name: String::from("Bob"),  //    |          |
            age: 30,                    //    |          |
            friend: None,               //    |          |
        };                              //    |          |
                                        //    |          |
        person = Person {               //    |          |
            name: String::from("Bob"),  //    |          |
            age: 30,                    //    |          |
            friend: Some(&friend),      //    | - lifetime 'a ของ struct Person<'a> จะถูก assign ด้วย 'friend
        };                              //    |          |
                                        //    |          |
    }                                   // ---+          |
                                        //               |
    // error: `friend` does not live long enough         |
    println!("{:?}", person);           //               |
}                                       // --------------+
Example 8.2: Function with lifetime
fn longest<'a, 'b>(x: &'a str, y: &'b str) -> &'a str {
    if x.len() > y.len() {
        x
    } else {
        y
    }
}

fn main() {
    let s1 = "long string is long".to_string();    // ------------+---> 's1, lifetime 'a ของ fn longest ถูก assign เป็น 's1
    let result;                                    //             +---> 'result
    {                                              //             |
        let s2 = "xyz".to_string();                // --+---> 's2 | lifetime 'a ถูกย้ายมายัง 's2 (เนื่องจากมีอายุสั้นกว่า)
        result = longest(&s1, &s2);                //   |         |
    }                                              // --+         |
                                                   //             |
    // จะเกิด error result does not live long enough               |
    println!("The longest string is '{result}'");  //             |
}                                                  // ------------+
Exercises
1. Move Semantics
แก้ Compiler Error ต่อไปนี้ โดยให้แก้ไขได้เฉพาะการเพิ่มหรือการลบตัวแปรอ้างอิง (ตัวอักษร &)
เท่านั้น
// TODO: Fix the compiler errors without changing anything except adding or
// removing references (the character `&`).

// Shouldn't take ownership
fn get_char(data: String) -> char {
    data.chars().last().unwrap()
}

// Should take ownership
fn string_uppercase(mut data: &String) {
    data = data.to_uppercase();

    println!("{data}");
}

fn main() {
    let data = "Rust is great!".to_string();

    get_char(data);

    string_uppercase(&data);
}
2. Mutable Borrowing
เขียนฟังก์ชัน update_and_print ที่รับ mutable reference ของ Vec
fn update_and_print() {
    // Your code here
}

fn main() {
    let my_vec: Vec<String> = vec![
        String::from("Apple"),
        String::from("Banana"),
        String::from("Cherry")
    ];
    update_and_print(&my_vec);

    // This should print:
    // Apple (updated)
    // Banana (updated)
    // Cherry (updated)
}
3. Lifetime Management
จงแก้ Compiler Error ต่อไปนี้ โดยห้ามแก้ไขส่วนของฟังก์ชัน longest
// Don't change this function.
fn longest<'a>(x: &'a str, y: &'a str) -> &'a str {
    if x.len() > y.len() {
        x
    } else {
        y
    }
}

fn main() {
    // TODO: Fix the compiler error by moving one line.

    let string1 = String::from("long string is long");
    let result;
    {
        let string2 = String::from("xyz");
        result = longest(&string1, &string2);
    }
    println!("The longest string is '{result}'");
}
Impl & Trait
Impl
note
Impl หรือ Implementation คือการกำหนดความสามารถเพิ่มเติมให้กับตัวแปรชนิดต่างๆ เช่น struct หรือ enum โดยการกำหนด method เพิ่มเติมให้กับตัวแปรนั้นๆ
Example impl
struct Rectangle {
    width: u32,
    height: u32,
}

impl Rectangle {
    // สร้าง Instance ใหม่ของ struct นี้
    fn new(width: u32, height: u32) -> Self {
        Self { width, height }
    }

    // เราสามารถกำหนดความสามารถเพิ่มเติมให้กับ struct ได้
    // ในที่นี้เรากำหนดความสามารถในการหาพื้นที่ของรูปสี่เหลี่ยมผ่าน method area
    // &self คือการอ้างอิงตัวเอง
    fn area(&self) -> u32 {
        self.width * self.height
    }
}

fn main() {
    let rect = Rectangle::new(30, 50);
    println!("Area of rectangle is {}", rect.area());
}
Trait
note
Trait คือ กลุ่มของคุณลักษณะ (methods) ที่กำหนดไว้ล่วงหน้า สามารถนำ impl ให้กับ struct หรือ enum เพื่อให้ struct หรือ enum เหล่านั้นมีความสามารถตามที่กำหนดใน trait เหล่านั้นได้
Example trait
// กำหนด trait คุณลักษณะที่ Animal มีร่วมกัน
trait Animal {
    fn eat(&self, food: &str) -> ();
    fn can_make_sound(&self) -> bool;

    // เราสามารถกำหนดค่า Default ให้กับ method ได้
    fn can_sleep(&self) -> bool {
        true
    }
}

struct Dog;
struct Cat;

// นำ Trait ไปใช้กับ struct
// เราจำเป็นต้อง implement ทุก method ที่ไม่มีค่า Default ใน trait นั้นๆ
impl Animal for Dog {
    fn eat(&self, food: &str) -> () {
        println!("Dog eat {}", food);
    }

    fn can_make_sound(&self) -> bool {
        true
    }
}

impl Animal for Cat {
    fn eat(&self, food: &str) -> () {
        println!("Cat eat {}", food);
    }

    fn can_make_sound(&self) -> bool {
        false
    }

    // สามารถ Override ค่า Default ได้
    fn can_sleep(&self) -> bool {
        false
    }
}

fn main() {
    let dog = Dog;
    let cat = Cat;

    dog.eat("Bone");
    cat.eat("Fish");

    println!("Dog can make sound: {}", dog.can_make_sound());
    println!("Cat can make sound: {}", cat.can_make_sound());

    println!("Can dog sleep: {}", dog.can_sleep());
    println!("Can cat sleep: {}", cat.can_sleep());
}
Inheritance Trait
note
เราสามารถสืบทอดคุณลักษณะของ Trait อื่นๆ ให้กับ Trait ที่เราสร้างได้โดย Syntax นี้:
trait ChildTrait: ParentTrait_1 + ParentTrait_2 + ...
tip
การ inheritance trait ChildTrait: ParentTrait_1 + ParentTrait_2 + ...
นี้ไม่ได้หมายความว่า ChildTrait จะมีคุณลักษณะของ ParentTrait ทั้งหมด แต่หมายความว่า
ก่อนจะสามารถใช้ ChildTrait ได้ จะต้องมีคุณลักษณะของ ParentTrait ทั้งหมดก่อนเสมอ
Example inheritance trait
trait Animal {
    fn eat(&self, food: &str) -> ();
    fn can_make_sound(&self) -> bool;
}
trait SomeOtherTrait {
    fn some_other_method(&self) -> ();
}

trait DogTrait: Animal + SomeOtherTrait {
    fn bark(&self) -> ();
}

struct Dog;

impl DogTrait for Dog {
    fn eat(&self, food: &str) -> () {
        println!("Dog eat {}", food);
    }

    fn can_make_sound(&self) -> bool {
        true
    }

    fn bark(&self) -> () {
        println!("Dog bark");
    }
}

fn main() {
    let dog = Dog;
    dog.eat("Bone");
    dog.bark();
}
Genric Trait Bound
note
เราสามารถใช้ประโยชน์ของ Trait ในการกำหนดคุณลักษณะของ Function ได้โดยการใช้
Generic Trait Bound เพื่อระบุว่า argument หรือ return type ต้องมีคุณลักษณะอะไรบ้าง
tip
การใช้ Generic Trait Bound นี้จะทำให้เรามีความยืดหยุ่นในการเขียนโปรแกรมได้มากขึ้น
โดยเราสามารถเขียนได้ 3 วิธี ดังนี้:
fn function_name<T: TraitName>(arg: T) -> Tfn function_name<T>(arg: T) -> T where T: TraitNamefn function_name(arg: impl TraitName) -> impl TraitName
Example Generic Trait Bound
trait Animal {
    fn eat(&self, food: &str) -> ();
}

struct Dog;
struct Cat;

impl Animal for Dog {
    fn eat(&self, food: &str) -> () {
        println!("Dog eat {}", food);
    }
}

impl Animal for Cat {
    fn eat(&self, food: &str) -> () {
        println!("Cat eat {}", food);
    }
}

fn main() {
    let dog = get_animal("Dog");
    let cat = get_animal("Cat");

    feed_animal(&dog);
    feed_animal(&cat);
}

fn get_animal(type: &str) -> impl Animal {
fn get_animal(type: &str) -> impl Animal {
    if type == "Dog" {
        Dog
    } else {
        Cat
    }
}

fn feed_animal(animal: &impl Animal) {
    animal.eat("Food");
}
Generic Type
note
Generic Type ใน Rust ช่วยให้เราสามารถเขียนโค้ดที่ยืดหยุ่นและนำกลับมาใช้ใหม่ได้ โดยไม่ต้องระบุชนิดข้อมูลที่แน่นอนล่วงหน้า ซึ่งทำให้โค้ดสามารถทำงานกับชนิดข้อมูลหลายๆ ชนิดได้
warning
การใช้ Generic Type กับ Function จำเป็นต้องระบุ Trait Bound ตามที่ Function ต้องการ
Use Generic Type with Struct
struct Point<T> {
    x: T,
    y: T,
}

impl<T> Point<T> {
    fn new(x: T, y: T) -> Self {
        Self { x, y }
    }
}

fn main() {
    // T จะกลายเป็นชนิดข้อมูลที่กำหนดในที่นี้คือ i32 และ f32
    let integer_point = Point { x: 1, y: 2 };
    let float_point = Point::new(1.0, 2.0);
}
Use Generic Type with Function
struct Rectangle {
    width: u16,
    height: u16,
}

trait HasArea {
    fn area(&self) -> u16;
}

impl Rectangle {
    fn new(width: u16, height: u16) -> Self {
        Self { width, height }
    }
}

impl HasArea for Rectangle {
    fn area(&self) -> u16 {
        self.width * self.height
    }
}

fn print_area<T: HasArea>(shape: T) {
    println!("Area: {}", shape.area());
}

fn main() {
    let rect = Rectangle::new(10, 20);
    print_area(rect);
}
Macro
note
ใน Rust มี macro อยู่ 2 ประเภทคือ
macro_fn!()หรือdeclarative macros- มีลักษณะและการใช้งานเหมือนกับ function ปกติ แต่ทำงานต่างกันที่macro_fn!()จะทำการสร้างโค้ดตามที่เรากำหนดไว้ขณะ compile time ในขณะที่ function จะทำงานที่ runtime#[macro_export]หรือprocedural macrosหรือattribute macros- จะใช้สำหรับกำหนดคุณลักษณะให้กับระบบการทำงานของ Rust เพื่อสร้างโค้ดตามที่เรากำหนดไว้ขณะ compile time
Declarative Macros
note
ข้อดีเมื่อเปรียบเทียบกับ function
- ไม่มี runtime overhead: code จะถูก inline expand ในขั้นตอน compile-time
- มีความยืดหยุ่นสูง: สามารถสร้างโค้ดที่ซับซ้อนได้โดยใช้ pattern matching
ข้อจำกัด:
- ยากต่อการเขียนและดีบัก: มี Syntax เฉพาะที่ค่อนข้างซับซ้อน ทำให้โค้ดอ่านยากขึ้น:
- ข้อความแสดงข้อผิดพลาดมักจะไม่ชัดเจนเท่ากับฟังก์ชัน
- ไม่สามารถใช้ในทุกบริบท: มีข้อจำกัดในการใช้งานบางสถานการณ์
Procedural Macros
tip
โดยส่วนมากแล้ว เรามักจะได้ใช้ procedural macros ในการกำหนดคุณลักษณะให้กับ struct,
enum อย่างง่ายๆ (ทางลัด) ผ่าน #[derive]
Example Procedural Macros
#![allow(unused)]
fn main() {
#[derive(Debug, Clone)]
struct User {
    name: String,
    age: u8,
}

// #[derive(Debug, Clone)] จะทำงานเหมือนกับการ manually impl Debug, Clone เองตามด้านล่าง
// impl Debug for User {
//     fn fmt(&self, f: &mut Formatter) -> Result {
//         write!(f, "User {{ name: {}, age: {} }}", self.name, self.age)
//     }
// }

// impl Clone for User {
//     fn clone(&self) -> Self {
//         User {
//             name: self.name.clone(),
//             age: self.age,
//         }
//     }
// }
}
Derive Macro
note
Derive Macroคือprocedural macroชนิดหนึ่งDerive Macroคือ shorthand impl Trait ให้กับตัวแปรชนิดต่างๆ เช่น struct หรือ enum โดยที่เราไม่ต้องเขียน impl Trait ด้วยตัวเองDerive Macroที่ได้ใช้บ่อยๆ มีดังนี้DebugPartialEqEqPartialOrdOrdCloneCopyDefault
warning
การ Derive ความสามารถให้กับ struct หรือ enum เกินความจำเป็นจะทำให้มีผลกระทบต่อ Performance เนื่องจากมีการ Allocate/Deallocate Heap Memory ที่สูงตามมา
Debug
note
ใช้สำหรับเพิ่มความสามารถในการ debug ค่าในตัวแปร เช่น struct หรือ enum ผ่าน
println!("{:?}", value) หรือ dbg!(value) โดยที่เราไม่ต้องเขียน impl Debug
ด้วยตัวเอง
Example Derive Debug
#[derive(Debug)]
struct Rectangle {
    width: u32,
    height: u32,
}

fn main() {
    let rect1 = Rectangle {
        width: 30,
        height: 50,
    };

    println!("rect1 is {:?}", &rect1);
    // หรือ
    dbg!(&rect1);
}
Clone
note
ใช้สำหรับเพิ่มความสามารถในการ Clone ค่าของ struct หรือ enum ไปสร้างตัวแปรใหม่ ผ่าน
method .clone()
tip
การ Clone จะทำให้ตัวแปรที่ถูก Clone มีค่าเหมือนตัวแปรต้น แต่เป็นตัวแปรใหม่ ที่มี Ownership เป็นของตัวเอง
Example Derive Clone
#[derive(Clone)]
struct Rectangle {
    width: u32,
    height: u32,
}

fn main() {
    let rect1 = Rectangle {
        width: 30,
        height: 50,
    };

    let rect2 = rect1.clone();

    // react1 จะยังสามารถใช้งานได้ เนื่องจากไม่มีการย้าย Ownership
    println!("rect1: {:?}", rect1);
    println!("rect2: {:?}", rect2);
}
Copy
note
ใช้สำหรับเพิ่มความสามารถในการ Clone ค่าของ struct หรือ enum ไปยังตัวแปรอื่น
โดยอัตโนมัติ โดยไม่ใช้ Move Semantics (เหมือน Primitive Types)
warning
- ต้องใช้คู่กับ Derive
Cloneพร้อมกันเท่านั้น - ใช้เมื่อจำเป็นเท่านั้น เนื่องจากมี Cost ในการ Allocate/Deallocate Heap Memory ที่สูงตามมา ทำให้มีผลกระทบต่อ Performance
Example Derive Copy
#[derive(Clone, Copy)]
struct Rectangle {
    width: u32,
    height: u32,
}

fn main() {
    let rect1 = Rectangle {
        width: 30,
        height: 50,
    };

    // rect1 จะถูก Copy ไปยัง rect2 โดยอัตโนมัติ โดยไม่ต้องใช้ method `.clone()`
    // ซึ่งทำให้ rect1 ยังสามารถใช้งานได้ เนื่องจากไม่มีการย้าย Ownership
    let rect2 = rect1;

    // rect1 จะยังสามารถใช้งานได้ เนื่องจากไม่มีการย้าย Ownership
    println!("rect1: {:?}", rect1);
    println!("rect2: {:?}", rect2);
}
PartialEq
note
- ใช้สำหรับเพิ่มความสามารถในการเปรียบเทียบความเท่ากัน
(== หรือ !=)ของ struct หรือ enum - อนุญาตให้มีค่าที่ไม่สามารถเปรียบเทียบกันได้ (เช่น NaN ใน floating-point number)
Eq
note
Eqเป็น trait ที่สืบทอดมาจากPartialEqEqรับประกันว่าความสัมพันธ์ความเท่ากันเป็นความสัมพันธ์สมมูล (equivalence relation) ทางคณิตศาสตร์ ดังนี้- สะท้อน (reflexive): สำหรับทุกค่า
a,a == aจะต้องเป็นจริง - สมมาตร (symmetric): สำหรับทุกค่า
aและb, ถ้าa == b,b == aจะต้องเป็นจริง - ถ่ายทอด (transitive): สำหรับทุกค่า
a,b, และc, ถ้าa == bและb == c,a == cจะต้องเป็นจริง
- สะท้อน (reflexive): สำหรับทุกค่า
warning
- ต้องใช้คู่กับ Derive
PartialEqพร้อมกันเท่านั้น - ไม่สามารถใช้กับ type ที่ไม่สามารถเปรียบเทียบกันได้ (เช่น NaN ใน floating-point number)
Example Derive PartialEq and Eq
// สามารถใช้ Eq ได้เนื่องจาก i32 มี equivalence relation
#[derive(PartialEq, Eq)]
struct RectangleInt {
    width: i32,
    height: i32,
}

// ไม่สามารถใช้ Eq ได้ เนื่องจาก f64 มีโอกาสเป็น NaN ซึ่งไม่สามารถเปรียบเทียบกันได้
#[derive(PartialEq)]
struct RectangleFloat {
    width: f64,
    height: f64,
}

fn main() {
    let rect_int1 = RectangleInt {
        width: 30,
        height: 50,
    };
    let rect_int2 = RectangleInt {
        width: 30,
        height: 50,
    };

    let rect_float1 = RectangleFloat {
        width: f64::NAN,
        height: 50.0,
    };
    let rect_float2 = RectangleFloat {
        width: f64::NAN,
        height: 50.0,
    };

    // true
    println!("rect_int1 == rect_int2: {}", rect_int1 == rect_int2);
    // false เนื่องจาก NaN ไม่สามารถเปรียบเทียบกันได้
    println!("rect_float1 == rect_float2: {}", rect_float1 == rect_float2);
}
PartialOrd
note
- ใช้สำหรับเพิ่มความสามารถในการเปรียบเทียบแบบมีลำดับ (Ordering) ของ struct หรือ enum
ด้วย
<,>,<=,>= - จะเปรียบเทียบค่า
<,>,<=,>=ตามลำดับ property ของ struct หรือ enum และจะ return ค่า boolean จาก property แรกที่มีค่า<,>,<=,>=กับคู่ที่เปรียบเทียบ
warning
PartialOrdต้องการPartialEqเป็นพื้นฐาน
Example Derive PartialOrd
#[derive(PartialEq, PartialOrd)]
struct Rectangle {
    width: u32,
    height: u32,
}

fn main() {
    let rect1 = Rectangle {
        width: 30,
        height: 50,
    };

    let rect2 = Rectangle {
        width: 30,
        height: 50,
    };

    println!("rect1 < rect2: {}", rect1 < rect2);
}
Ord
note
Ordเป็น trait ที่สืบทอดมาจากPartialOrdและEq- รับประกันว่าทุกคู่ของค่าสามารถเปรียบเทียบกันได้และมีลำดับที่ชัดเจนเท่านั้น (Total ordering)
warning
- ต้องใช้คู่กับ Derive
PartialOrd,PartialEq, และEq - ไม่สามารถใช้กับ type ที่ไม่สามารถเปรียบเทียบกันได้ (เช่น NaN ใน floating-point number)
Example Derive PartialOrd and Ord
// สามารถใช้ Ord ได้เนื่องจาก i32 มี total ordering
#[derive(PartialEq, PartialOrd, Eq, Ord)]
struct RectangleInt {
    width: i32,
    height: i32,
}

// ไม่สามารถใช้ Eq ได้ เนื่องจาก f64 มีโอกาสเป็น NaN ซึ่งไม่สามารถเปรียบเทียบกันได้
#[derive(PartialEq, PartialOrd)]
struct RectangleFloat {
    width: f64,
    height: f64,
}

fn main() {
    let rect_int1 = RectangleInt {
        width: 30,
        height: 50,
    };
    let rect_int2 = RectangleInt {
        width: 30,
        height: 50,
    };

    let rect_float1 = RectangleFloat {
        width: f64::NAN,
        height: 50.0,
    };
    let rect_float2 = RectangleFloat {
        width: f64::NAN,
        height: 50.0,
    };

    // true
    println!("rect_int1 < rect_int2: {}", rect_int1 < rect_int2);
    // false เนื่องจาก NaN ไม่สามารถเปรียบเทียบกันได้
    println!("rect_float1 < rect_float2: {}", rect_float1 < rect_float2);
}
Default
note
ใช้สำหรับเพิ่มความสามารถในการสร้าง struct หรือ enum
ตัวใหม่ให้มีค่าเป็นค่าเริ่มต้นของตัวแปรชนิดต่างๆ ผ่าน method ::default()
Example Derive Default
#[derive(Default)]
struct Rectangle {
    width: u32,
    height: u32,
}

// หากเป็น enum จำเป็นต้องกำหนดค่า default เองด้วย `#[default]` attribute
#[derive(Debug, Default, PartialEq)]
enum Test {
    A,
    #[default]
    // กำหนดให้ B เป็นค่า default ของ enum Test
    B,
    C,
}

fn main() {
    let rect1 = Rectangle::default();
    let test_enum = Test::default();

    assert_eq!(rect1.width, 0);
    assert_eq!(rect1.height, 0);
    assert_eq!(test_enum, Test::B);
}
Exercise
- ทำให้ struct
Userสามารถ Debug ได้
enum UserType {
    Admin,
    User,
}

struct User {
    name: String,
    age: u8,
    user_type: UserType,
}


fn main() {
    let user = User {
        name: "John Doe".to_string(),
        age: 20,
        user_type: UserType::Admin,
    };

    println!("user: {:?}", user);
}
- ทำให้ struct
Userสามารถเปรียบเทียบความเท่ากันได้ (==และ!=)
enum UserType {
    Admin,
    User,
}

struct User {
    name: String,
    age: u8,
    user_type: UserType,
}

fn main() {
    let user1 = User {
        name: "John Doe".to_string(),
        age: 20,
        user_type: UserType::Admin,
    };

    let user2 = User {
        name: "Jane Doe".to_string(),
        age: 20,
        user_type: UserType::User,
    };

    println!("user1 == user2: {}", user1 == user2);
}
- ทำให้ struct
Userสามารถ Clone ได้
enum UserType {
    Admin,
    User,
}

struct User {
    name: String,
    age: u8,
    user_type: UserType,
}

fn main() {
    let user1 = User {
        name: "John Doe".to_string(),
        age: 20,
        user_type: UserType::Admin,
    };

    let user2 = user1.clone();

    println!("user1: {:?}", user1);
    println!("user2: {:?}", user2);
}
Display Trait
note
Display traitใช้ในการเพิ่มความสามารถให้กับ struct หรือ enum ให้สามารถแสดงผลผ่านการเรียกใช้ฟังก์ชันformat!หรือprintln!ได้ รวมถึงได้ความสามารถในการแปลงข้อมูลเป็น String ผ่าน methodto_string()ได้- เนื่องจาก
Display traitไม่มี Derive Macro ให้ใช้งาน จึงจำเป็นต้อง impl ด้วยตัวเอง
Example iml Display trait
use std::fmt::{Display, Formatter, Result};

struct Test {
    name: String,
    age: u8,
}

impl Display for Test {
    fn fmt(&self, f: &mut Formatter<'_>) -> Result {
        write!(f, "Test {{ name: {}, age: {} }}", self.name, self.age)
    }
}

fn main() {
    let test = Test {
        name: "John".to_string(),
        age: 20,
    };

    let test_string: String = test.to_string();

    println!("{}", test);
}
JSON
note
- Rust ไม่สามารถทำงานกับ JSON ได้โดยตรงเหมือนกับ NodeJS
- ต้องใช้ 3rd-party crate เข้ามาช่วย ได้แก่
serdeและserde_json - `serde_json' จะสามารถช่วยแปลงค่า String หรือ struct ของ Rust ให้กลายเป็น JSON ได้
- JSON ใน Rust จะมี type เป็น
serde_json::Value - มี Derive Macro จาก
serdeที่ช่วยในการทำงานระหว่าง struct กับ JSON 2 ตัวดังนี้Serializeช่วยในการแปลง struct ให้กลายเป็น JSONDeserializeช่วยในการแปลง JSON ให้กลายเป็น struct
Add serde and serde_json to Cargo.toml
[dependencies]
serde = { version = "1.0", features = ["derive"] }
serde_json = "1.0"
or
cargo add serde serde_json -F serde/derive
Convert String to JSON Directly
tip
serde_jsonมี macro_fn ชื่อjson!ที่ช่วยในการแปลง String หรือตัวแปรอื่นๆ ให้กลายเป็น JSON ได้แบบง่ายๆ ดังตัวอย่างด้านล่าง
warning
- แต่การทำเช่นนี้ จะทำให้ตัวแปรที่ได้สูญเสียความสามารถของการตรวจสอบ Type ของข้อมูลและทำให้ Intellisense ของ IDE สูญหายไป
use serde_json::{json, Value};

fn main() {
    let json: Value = json!({
        "name": "John Doe",
        "age": 30
    });

    println!("{}", json);
}
Serialize
tip
- ใช้ในการแปลง struct ให้กลายเป็น JSON
Example Serialize
use serde::{Serialize, json};

#[derive(Serialize)]
struct User {
    name: String,
    age: u8,
}

fn main() {
    let user = User {
        name: "John Doe".to_string(),
        age: 30,
    };

    let json = serde_json::to_value(&user).unwrap();

    println!("{}", json);
}
Deserialize
tip
- ใช้ในการแปลง JSON ให้กลับเป็น struct
Example Deserialize
use serde::{Deserialize, json};

#[derive(Debug, Deserialize)]
struct User {
    name: String,
    age: u8,
}

fn main() {
    let json: Value = serde_json::json!({
        "name": "John Doe",
        "age": 30
    });

    let user: User = serde_json::from_value(json).unwrap();

    println!("{:?}", user);
}
Asynchronous Runtime
note
- โดยปกติแล้ว การทำงานของ Rust จะเป็น Synchronous หมายความว่า ทุกอย่างจะต้องทำงานอย่างต่อเนื่องจากการทำงานของตัวมันเอง
- แต่ถ้าหากต้องการทำงานแบบ Parallel หรือ Asynchronous, Rust เองก็มีการสนับสนุนในการทำงานแบบนั้นได้ โดยการใช้งาน Thread หรือ Task หรือ Future (คล้ายๆ Promise ใน NodeJS) ด้วยเช่นกัน
- แต่ก็มีทางเลือกอีกทางที่ง่ายกว่านั้น ก็คือการใช้งาน Async Runtime ผ่าน Crate ที่ชื่อว่า
Tokio Tokioคือ Crate ที่สร้างขึ้นมาเพื่อสนับสนุนการทำงานแบบ Asynchronous และ Parallel ใน Rust โดยทำหน้าที่จัดการการทำงานของ Thread หรือ Task หรือ Future ให้ง่ายขึ้น ผ่าน SyntaxAsync/Awaitที่เราคุ้นเคยกันมาจาก NodeJS- Web framework หรือ Database ส่วนใหญ่ของ Rust จะทำงานแบบ Asynchronous อยู่บน
Tokio Runtimeเช่นAxum,Actix,Rocket,Warp
tip
Async/AwaitของTokio Rustจะใช้งานคล้ายกับAsync/Awaitของ NodeJS แต่เบื้องหลังการทำงานจะแตกต่างกัน- สำหรับ NodeJS จะใช้งานผ่าน
Event Loopที่ทำงานอยู่ในภายใน Single Thread - สำหรับ Rust จะใช้งานผ่าน
ThreadหรือTaskที่ทำงานอยู่ในภายในThread Poolซึ่งจะทำงานอยู่บน Core ของ CPU ที่มีทั้งหมด ทำให้ Rust สามารถทำงานแบบ Parallel ได้โดยสมบูรณ์
- สำหรับ NodeJS จะใช้งานผ่าน
How Tokio Runtime Work
tip
- Thread Pool:
Tokioใช้ thread pool ในการจัดการ task ต่างๆ โดยจะมีการสร้าง thread ขึ้นมาเป็นจำนวนหนึ่งตามจำนวน core ของ CPU ที่มีอยู่ - Task Scheduling:
Tokioมี task scheduler ที่ทำหน้าที่จัดสรร task ต่างๆ ให้กับ thread pool เพื่อให้การทำงานเป็นไปอย่างมีประสิทธิภาพ - Async/Await: การใช้งาน
asyncและawaitในTokioจะช่วยให้การเขียนโค้ดแบบ asynchronous ง่ายขึ้น โดยไม่ต้องจัดการกับ thread โดยตรง - Event Loop:
Tokioมี event loop ที่ทำหน้าที่ตรวจสอบ event ต่างๆ และจัดการกับ task ที่พร้อมจะทำงาน - Resource Management:
Tokioจัดการ resource ต่างๆ เช่น network connection, file I/O, และ timer ให้เป็นไปอย่างมีประสิทธิภาพ - Thread Safety:
Tokioจัดการ thread ให้เป็นไปอย่างปลอดภัยในการเข้าถึง resource ต่างๆ โดยใช้SendและSynctrait ของ Rust เพื่อให้แน่ใจว่า data ที่ถูกแชร์ระหว่าง thread นั้นปลอดภัย
How to use Tokio Runtime
Add Dependency
[dependencies]
tokio = { version = "1.0", features = ["macro", "rt-multi-thread"] }
or
cargo add tokio -F rt-multi-thread,macro
Change Main Function to #[tokio::main]
#[tokio::main]
async fn main() {
    println!("Hello, world!");
}
Use Async/Await Function
tip
async fnคือ Function ที่ทำงานแบบ Asynchronous (ไม่ block การทำงานของ Thread)async fnจะต้องถูกเรียกใช้ผ่าน.awaitเสมอ- code ที่อยู่บรรทัดถัดจาก
.awaitจะต้องรอการทำงานของasync fnให้เสร็จสิ้นก่อนจึงจะทำงานต่อได้ - เหมาะกับงานประเภท
I/O-boundที่มักจะใช้เวลาส่วนใหญ่ในการรอการตอบสนองจากระบบภายนอก (เช่น การอ่าน/เขียนไฟล์, การเชื่อมต่อเครือข่าย)async fnช่วยให้สามารถปล่อยทรัพยากร (เช่น thread) ให้ทำงานอื่นได้ในระหว่างที่รอ I/O - จะต้องประกาศ
fn mainเป็นasync fnด้วย#[tokio::main]ก่อนเท่านั้น
// จำเป็นต้องมีการประกาศ `#[tokio::main]` เพื่อทำให้ application นี้รองรับการทำงานแบบ Asynchronous
#[tokio::main]
async fn main() {
    // required `.await` to run async function
    do_something().await;
}

// Define `async` keyword in front of function
async fn do_something() {
    // TODO: Implement
}
Use Spawn Task to Run Background Process
tip
tokio::spawnจะสร้าง task ใหม่ที่ทำงานอยู่เบื้องหลังของโปรแกรม และจะเริ่มทำงานทันที่ถูกสร้าง tasktokio::spawnจะแตกต่างจากasync fnตรงที่tokio::spawnไม่จำเป็นต้องรอการทำงานของ task ให้เสร็จสิ้นก่อนที่จะทำงาน code ในบรรทัดถัดไปได้- เหมาะกับงานประเภท
CPU-boundที่สามารถทำงานพร้อมกันหลาย process ได้ - สามารถรอ task ให้ทำงานเสร็จสิ้นก่อนที่จะทำงานต่อได้ผ่าน
.awaitได้เช่นกัน - จะต้องประกาศ
fn mainเป็นasync fnด้วย#[tokio::main]ก่อนเท่านั้น
use tokio::time::{sleep, Duration};

#[tokio::main]
async fn main() {
    println!("เริ่มโปรแกรม");

    // สร้าง task เพื่อให้ทำงานอยู่เบื้องหลังของโปรแกรม
    let task = tokio::spawn(async {
        for i in 1..=5 {
            sleep(Duration::from_secs(1)).await;
            println!("Task ทำงาน: ครั้งที่ {}", i);
        }
        println!("Task เสร็จสมบูรณ์!");
    });

    // รอสักครู่เพื่อให้เห็นผลของ task
    println!("รอ task ทำงาน");
    sleep(Duration::from_secs(3)).await;
    println!("หมดเวลา");

    // รอ task ให้ทำงานเสร็จสิ้น
    // task.await.unwrap();
    println!("โปรแกรมหลักจบการทำงาน");
}
Inline Documentation
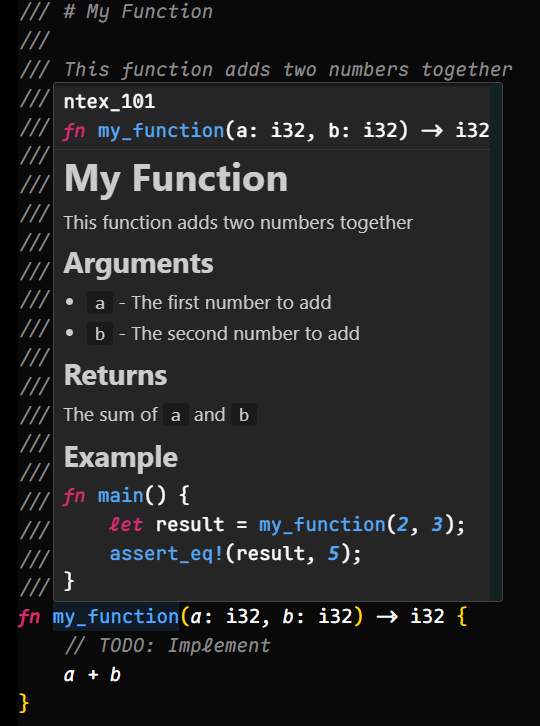
note
Rust มีการสนับสนุนการเขียน Inline Documentation หรือ Inline Doc อย่างมีประสิทธิภาพ
ซึ่งเราสามารถเขียน Inline Doc ได้ผ่านการใส่ Comment /// แบบนี้ในรูปแบบของ
Markdown syntax ได้
tip
- Rust สามารถตรวจสอบความถูกต้องของ
Inline Docรวมถึงสามารถเขียน Test ภายในInline Docได้อีกด้วย โดยสามารถตรวจสอบได้ผ่านการรันcargo testเราจึงสามารถมั่นใจได้ว่าInline Docที่เราเขียนนั้นถูกต้องและสามารถใช้ได้จริง - ด้วยเหตุนี้ Library ส่วนใหญ่ของ Rust จึงมี
Inline Docที่มีประสิทธิภาพ และเพิ่มความสะดวกในการใช้งานอย่างมาก
Example
เขียน Inline Doc ด้วย ///
fn main() {
    my_function();
}

/// # My Function
///
/// This function adds two numbers together
///
/// ## Arguments
///
/// * `a` - The first number to add
/// * `b` - The second number to add
///
/// ## Returns
///
/// The sum of `a` and `b`
///
/// ## Example
///
/// ```rust
/// fn main() {
///     let result = my_function(2, 3);
///     assert_eq!(result, 5);
/// }
/// ```
fn my_function(a: i32, b: i32) -> i32 {
    // TODO: Implement
    a + b
}
ผลลัพธ์๋ที่ได้
Contributor

Kaizer303 💻 |

kengzzzz 💻 |

nengapi 💻 |

dulyakit 💬 |

chaowakrit 💬 |
Contribution Types
- 💻 Development - Contributing to project documentation and content
- 💬 Support - Helping answer questions